Where I work, from a photographer's perspective, it is dark. This would be fine by me, except that I am required to take photographs of product all day. Mine is a decent enough camera, but it has its limitations. Due to graininess at higher settings, I almost always shoot at ISO 200. I would love to use 100 or 50, but because it is so dark in the shop, there is just too much motion-induced blur, even when the below techniques are used. The solution to a dim area is usually the use of a flash, but this one does bad things with glare and white balance.
So I have to use a slow shutter and a wide aperture. This lens gets to f2.8, which is better than some point-and-shoots, but sometimes I wish I could break into the low f1 range with the lighting I have to deal with. By "slow shutter," I mean I regularly take 1/13sec. exposures. Sometimes I have to go to 1/8sec or slower . . . at f2.8! This my friends is a recipie for
We had a rifle in the shop one day and MM (a former Marine) and I were
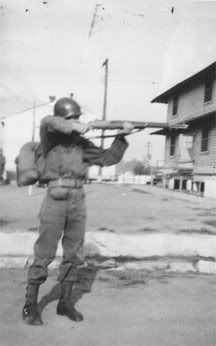
MM said there was a better way to shoot offhand, as he was taught by Uncle Sam's Misguided Children - and as he used against Bad Guys in the jungle. This one can be better used with a rifle with better balance:
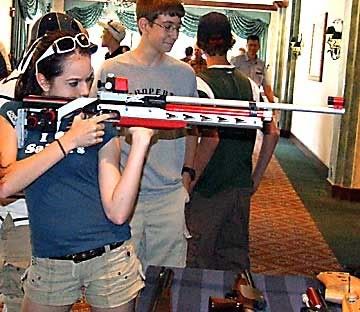
(image from pyramidair.com)
Note the supporting arm elbow is cranked way over in front of the torso, and the weight of the rifle is borne on the ribs. If a gun is not so muzzle-heavy as to tip down when held so, and the recoil won't tear it off the support hand, this can be a good method to practice with, for a shot that can't wait for a supported firing position. Note that the girl is leaning backward for more stable support, and the man is leaning forward. She has a light-recoiling rifle and spare time, but he is in a hurry with his .30-06. If you will be needing rapid follow-up shots and/or have some recoil to deal with, you might want to lean forward a little to absorb recoil down through your back leg.
Cameras VFD, we're here for cameras!
Right, right, cameras. Without really thinking about it, I have found that rifle firing skills cross over to camera shooting fairly well. The problems with these holding techniques are familiar to rifle shooters: your pulse makes your hands jump, and your breath is pushing your hands all over the place. Plus your arms don't weigh nothing and (especially with a heavy camera) they can get tired holding your camera up in front of you. Shutter/pulse timing and breath control are CRITICAL when using these camera holding techniques with a slow camera shutter. Below, you can see how to minimize camera shake as much as I have found possible without so much as a $0 monopod.
********
Note:
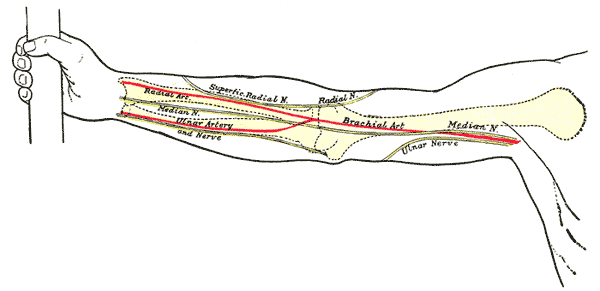
You have a huge source of jitter in your brachial artery. If you jam your upper arm sideways against your torso for support, it will make your sights and viewfinder jump big-time. You do not want to put ribs against arteries. You want ribs against the soft artery-free flesh of your arm. Your goal with these first two techniques is to put your supporting arm against your ribs in a way that the ribs are not pushed against by the arteries in your arm. Note how the raidal and ulnar arteries are smaller and spaced away from the middle of the forearm.
For shooting an object below eye-level at a significant downward angle, I tend to go with something like this:
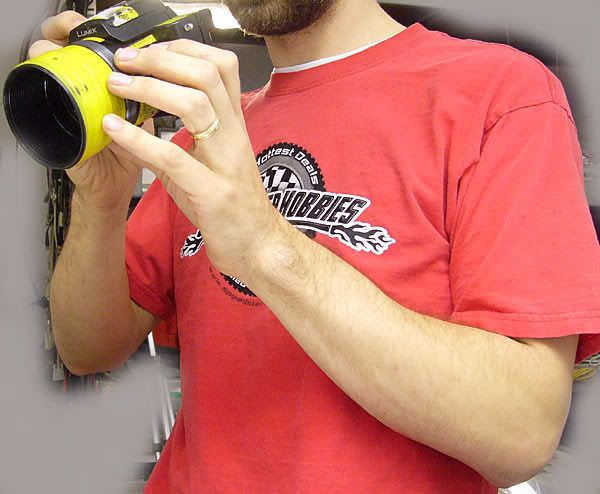
My right (firing/shutter button) arm is not touching my body. If you were shooting at your feet, I suppose it would be alright to put both arms at your side. To get the camera up and still be able to use the LCD viewfinder*, one arm has to be off the body. The forearm of the supporting arm is pushing gently on the side of the chest so that the arteries in the forearm are not pushing on a rib.
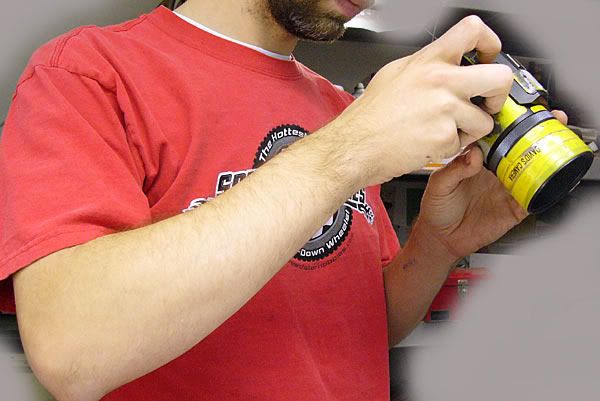
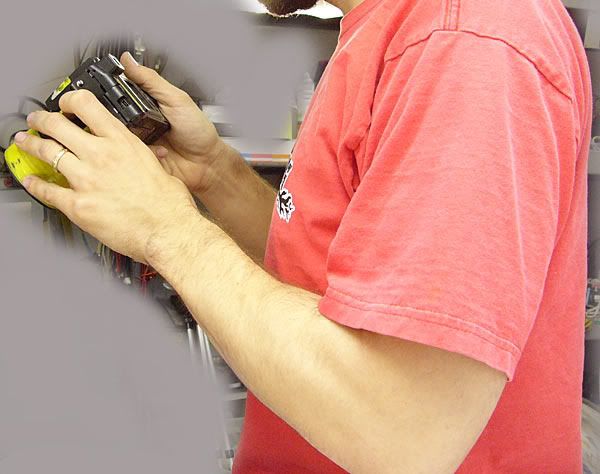
That hold is for shooting down. Unless you lean 'way over backwards, the hold for shooting horizontally or up has to change a bit. Do not be tempted to just raise the arm and push sideways against your ribcage with the upper arm. The brachial artery will fight you, and you will get motion blur. DO NOT DO THIS:
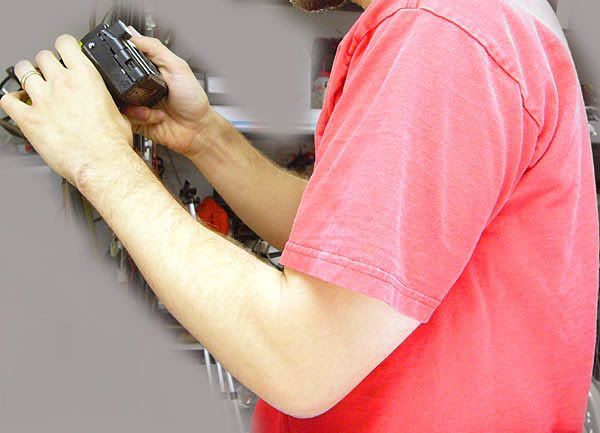
Scroll up and look at that girl's supporting arm again. See how she's all twisted-up looking? That brachial artery is pushing against open air. Put your elbow in front of your chest so the back of the arm (with no major arteries in it) is against the chest. Some people will find that they can rest their elbows on their hip bones. If there is some padding (clothing) between them, this may be alright. If there is insufficient padding, you may find that bone-on-bone resting is a good way to induce wobble. If so, reposition yourself! Others will find that they have slightly more-rounded front sides, and that a belly is as good as a rib cage for supporting the back of the supporting arm. Translated to holding a camera, it looks something like this:
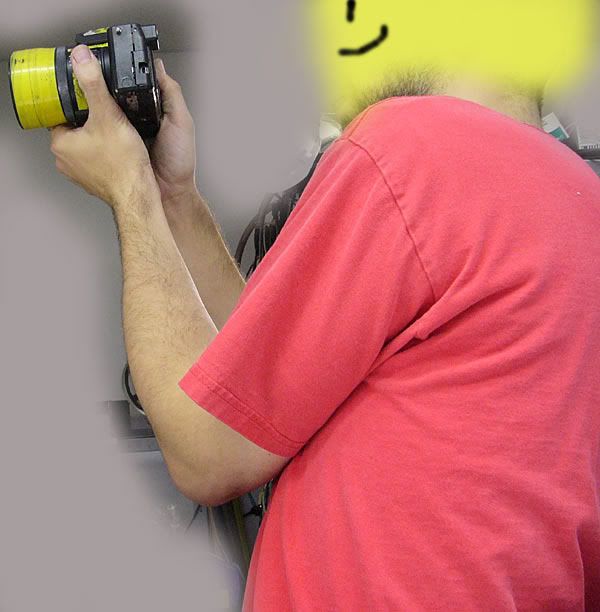
The arm is completely in front of the body.
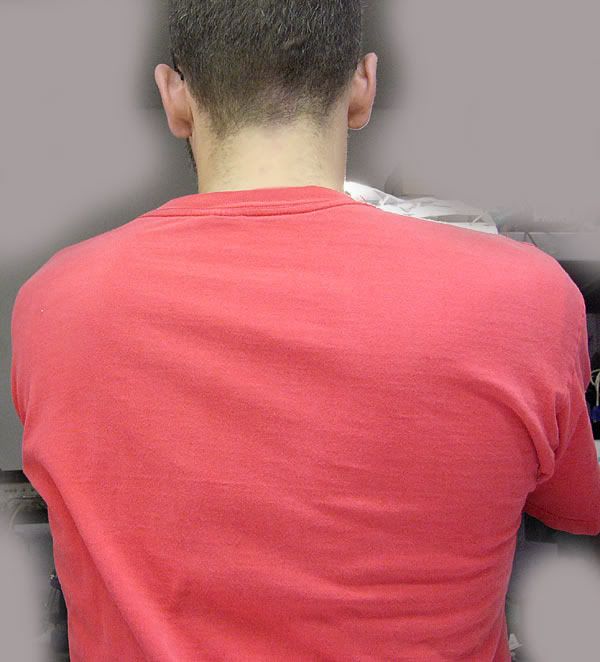
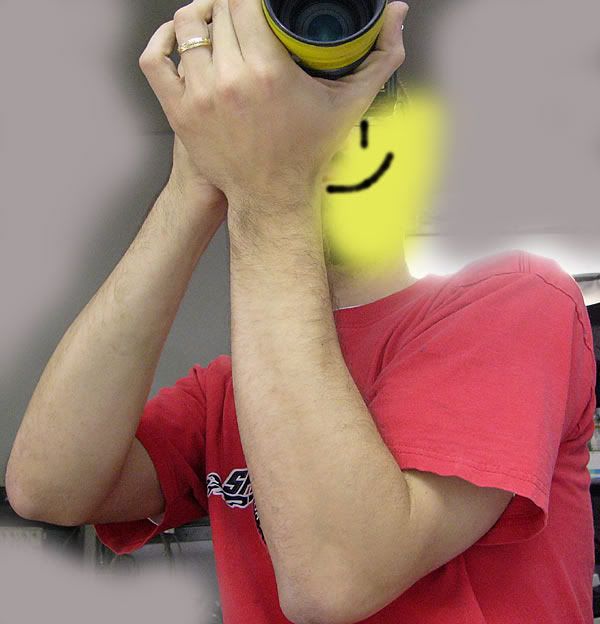
You will find both these postures somewhat awkward to use. They are not intended for the photographer's comfort, they are intended to reduce the potential for motion-induced blur when the shutter is open for a significant fraction of a second. It shouldn't hurt to shoot this way unless you have bad joints in your carcass, but don't be surprised that it takes some getting used to.
That's what I do for standing photographs. It's fast and easy once you get your body used to holding itself just-so. Those are variations of off-hand rifle shooting technique. Here are a couple of variations of the 'rice paddy prone' position. For those who do not know, Prone is the most stable unsupported rifle firing position. Very few things are more rock-steady than the ground itself!
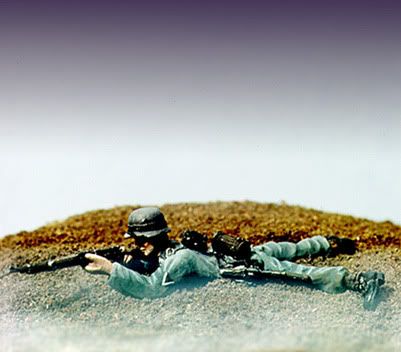
(image from Hobby Bunker)
But if the ground is a few inches underwater, as in a rice paddy:
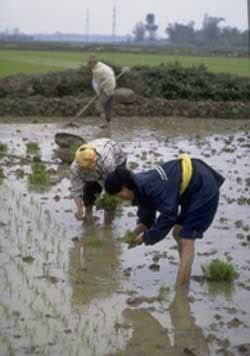
(image from Global Education)
Then the next-most stable position from which to shoot rifles (without getting soaked/muddy and/or drowning) is the "rice paddy prone"
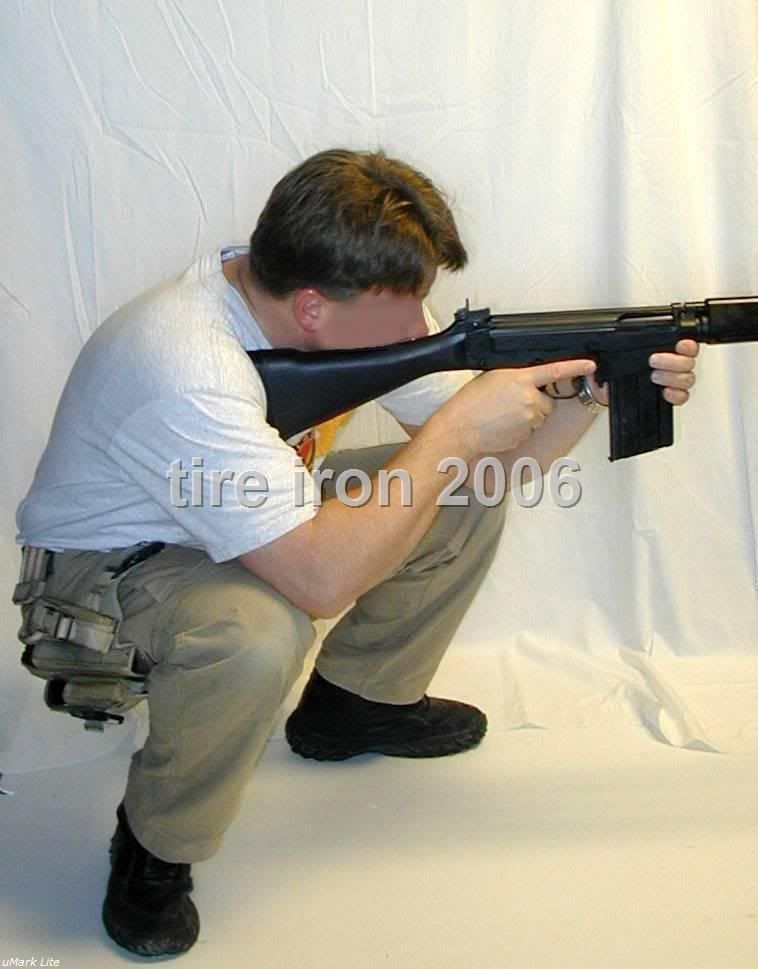
(image from Tire Iron at unidestatesmilitia.com)
Again, this translates well to use with a camera. If you can assume this position it is fairly stable. Some people can't bend their legs this far. Some can't get their heels flat on the floor. It is critical to do both. You want your heels firmly on the floor, and you want to SIT on the backs of your feet. With a smaller-than-a-rifle camera, you can keep your hands close in to your body. It is important to remember, however, hands-near or hands-far, with a rice paddy prone camera (or rifle) hold, NEVER put the bones of your elbows on the bones of your knees. They will turn your camera into a weeble. You CAN NOT hold a camera still with your elbow on the knee!
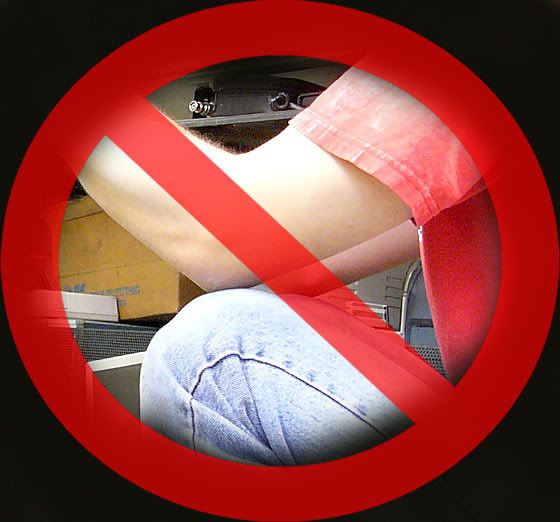
You want your elbow to rest on your thigh, or in the alternative rest your triceps on your knee. Soft-on-hard or hard-on-soft, never hard-on-hard!
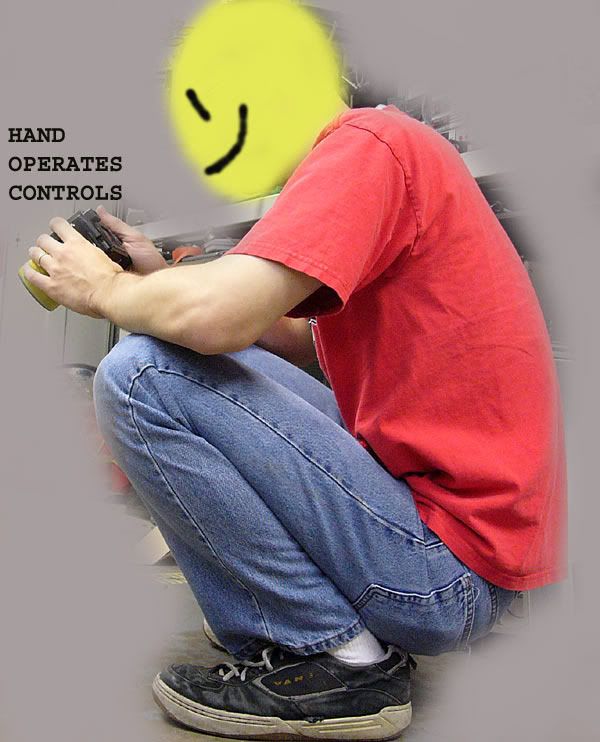
If you are so inclined, or if the terrain or high winds at your photo shoot demand it, you can stick a leg out in front, but be absolutely certain that your heels are planted!
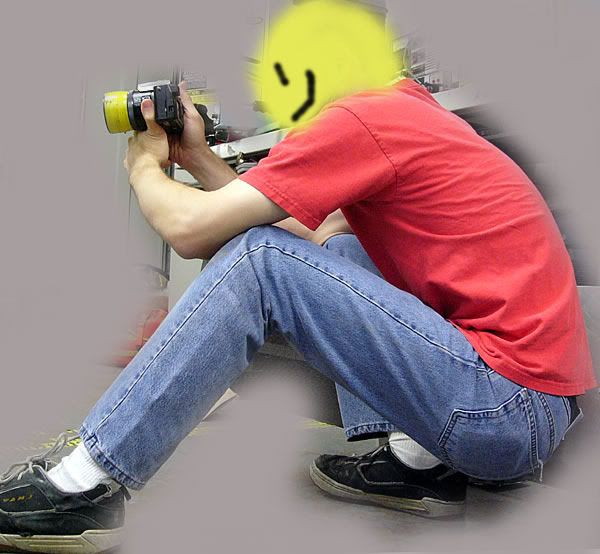
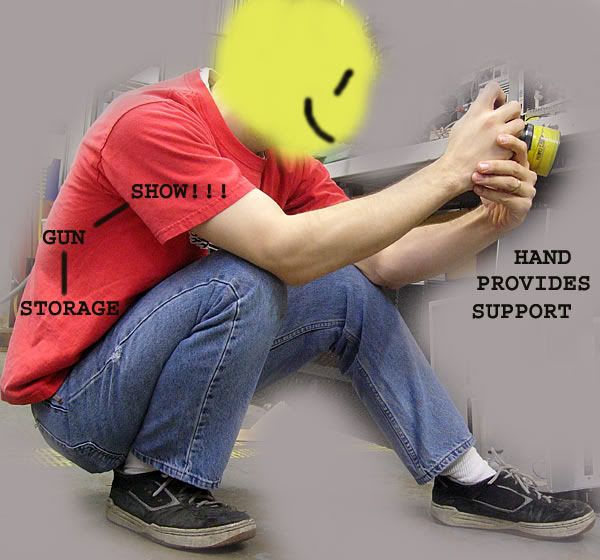
No, my toes are not curled up off the floor in the above images - the toes are flat, but my grubby $8 work shoes are too big. Think curly-toed elf shoes here.
Notes:
These photos show my hands in various positions on the camera. Reach around the far side for more stability if your camera allows you to. Play with this for a few minutes and you'll probably see what I mean. If you must, for control manipulation or personal preference, you can of course keep your support hand on the same side as the supporting arm. Remember that even your fingers have camera-moving arteries in them. You might support the camera on a fist, even. Whatever works for you.
There is no set-in-stone best practice. Terrain, weather, equipment type, and phase of the moon all may dictate slight variations on these holding techniques. The point is holding your camera still, not perfect form. Like any photographic technique, you will have to experiment a bit before realizing optimal results.
*If you don't have a real-time LCD viewfinder (looking at you, SLR/DSLR users) you will have to adapt these techniques to that fact. It shouldn't be too hard.
This article started at Les Jones' Blog, where I told him I'd get back with him about what I do for slow shooting. For the next couple of days at work I paid attention to what I was doing, and made some photographs of it. I mentioned at his site that my camera has some sort of anti-shake stuff ostensibly going on inside. I turned it off and found that, using these holds, the anti-shake only gives me either a few fewer exposures or one timing setting gain (say 3 vs 8 shots for a decent picture, or 1/6 vs. 1/8 sec.) and the benefit was surprisingly small. I can't really blame the camera though. This is really tripod-range timing. Good luck.
No comments:
Post a Comment
I will review your comments prior to publishing them. Almost all comments are approved and published within a day or two. When you post a comment, Please bear in mind that you are addressing me personally. To be clear: I generally prefer clarity to agreement. Make your point, but be nice about it and don't annoy me, and you will likely see your comments published here.
Comment Moderation Statement