The video says it all, and it's only 30 seconds long. Go watch it.
thank a service member
Saturday, April 26, 2008
Friday, April 25, 2008
Observations From the Grocery Store
We went shopping last night and I noticed a couple of things:
When I went out shopping by myself recently, I realized that being in a grocery store is a security *nightmare*. Blind corners all over the place, random people going random speeds in random directions with no compunction about invading your personal space.
Last night I noticed that most everyone is in Condition White constantly and approximately NO threat to anyone. I went with a gut feeling and just kept glancing around every several seconds to keep tabs on the herd. On only ONE occasion did I see somebody walking around conscious, and we made eye contact long enough for both of us to go from Condition Orange back to Condition Yellow (2-3 seconds) from about 7 yards away.
Almost without exception, everyone else is 1/2 to 3/2 absorbed in what they are doing, be it looking at shelves, dealing with kids, looking at signs, or talking on a cell phone and doing any of the foregoing. To these people, my family and I may just as easily have been so many fixtures in the store, or moving pieces of produce or furniture or something. If I wanted to, I'm pretty sure I could have paid for my groceries from a stranger's purse without even trying hard. Then they wonder how they "never saw it/him until it was too late". Sad, really.
Also, since this is Central Texas, we needed more pseudoephedrine. Apparently cooler heads didn't prevail a few years back, and this highly useful chemical is now controlled. I got myself somewhat used to the idea, and now I have dulled my offense-taking enough not to make jokes about being a criminal with the pharmacy technicians when I go to buy some *expletive deleted* sudafed. The Wife came up and said to get some nose juice prevention syrup for the kids, too.
The pharmacist says I have to choose between getting a 2 week supply of pills for me, or a 1 week supply and a bottle for the rugrats. 2 items. 2 items containing the oh-so-dangerous and EEEeeevil pseudoephedrine. And no, you can't have that in a large quantity package.
Thanks Congressman, I'll sure vote to re-elect YOU! I feel SAFE knowing that I could steal any random person's drivers's licence and use it to purchase a felonious amount of COLD MEDICINE in their name. Good job.
Maybe I'll go stand in line at the TSA screening stations at the airport while the guy next to me manages to sneak a grenade through as they search a baby's diaper for suspicious clear liquids. Then I'd really feeeeel safe.
You know, in other countries they KILL the people who make hard drugs, and the LET people go EVERYWHERE with weapons.
I'm just sayin'.
Thursday, April 17, 2008
popeep, a Free Peep Sight for SKS and AK Rifles
My last pair of glasses was issued to me in 2001 and it wasn't a great prescription back then. These days, 50 yards is blurry and 100 yards is pretty much a guess, until I can cough up for some new glasses.
The open iron sights on the SKS (and AK) are not made for people who can't see long ranges and focus on sights at the same time.
I had entertained the idea of buying some peep sights for my little rifle, which range from a $29 drop-in replacement for the stock sight (minus the range adjustment) all the way to half what I paid for the rifle for a dual-adjustable sight (that also makes the rifle more complicated to take down). Everything seemed unappealing to me, and I just waited.
That $29 drop-in replacement sight leaf seemed like a pretty simple afair and eventually I got to thinking I could come close in my home workshop.
I tried supergluing a thin piece of steel on the sight and it helped but the glue wasn't up to the task. Then I went with this:
(click for full-size image)

That's a random piece of thin sheet steel, cut with tin snips and bent tight around the sides and bottom sight to hold it. The hardest part was making the arch close to symmetrical. Then it was bending the steel. If you can't figure out how to do this without detailed instructions, you don't want me to explain it to you before I've had coffee.
Trust me.
Anyway, the glue-on and the popeep both shrunk my groups by about 30%. In my hands with russian mil-surp ammunition, the rifle is an 8MOA player. That's minute-of-head and good enough for me, for now. My dad, who spent a few thousand dollars getting his eyes fixed, shot around 3-4MOA his first time on the SKS and it was his first rifle shoot in a while.
Why popeep? a) it's little and b) it's for po' folks who want a peep sight.
That is all.
Wednesday, April 16, 2008
DIY: SKS Trigger Job Instructions (Improve the Trigger on an SKS Carbine)
If you want an SKS with a better trigger, read this.
DISCLAIMER: On this page, I tell you how to improve the trigger on an SKS (Simonov) rifle. If you choose to do what I tell you how to do here, you do so at your own risk. This page is presented for informational purposes only and you bear full responsibility for any legal liability, property damage, injury, or death that may occur because you messed up your rifle. If you know someone who will undertake to do this work for you, the majority of it could be done if you sent only the complete trigger group, without sending the FFL-required receiver or a whole weapon. If you want ME to do this labor for you, my contact information is at the bottom of this page.
The work shown/described below was done on a Chinese (Norinco) SKS manufactured some time around 1968, but your SKS's action should be very similar. The trigger job is almost exactly the same, whether your rifle is a Chinese, Russian, Yugoslavian, Romanian, Albanian, or whatever other country decided to make copies of the SKS. They are all pretty close to the same with only very minor variation, when it comes to the trigger group.
This page was last updated 09/16/2011, with minor changes to clarify the text.
Click on any image to see it MUCH CLEARER, full-size; Google reduces the quality of the images on this page to speed page loads
The SKS pattern rifle, for what it is, is nearly perfect. You can make it cheap, abuse and neglect it, pick it up out of the dirt and it will fire with 100% reliability. There is no magazine to lose, and cleaning is largely optional. If what you are after is cover and general fire at the other side, the SKS is perfect in large numbers. Throw an AK or two in the mix, and you have an ugly situation for the imperialist dogs (just ask a veteran who's been on that other side). However, if you are wanting to kill a specific capitalist pig, or, say, a paper Osama or a Zombie, from a distance, then the accuracy of the SKS rifle could usually use some improvement. If you want to go burn off some steam and a few hundred rounds of 7.62x39, your trigger finger muscles will be getting tired and your friend with the AR will laugh at you because the stock trigger on most SKSs is:
Creepy
Gritty
Stacky
Dangerous
Any combination of the above.
With care, all of these can be largely remedied by a first time home gunsmith (i.e., you). You'll need some hand tools and abrasives, and that's about it. The operation of the trigger group is fairly simple. Charge the trigger by pulling back the hammer, depress the disconnector appropriately, pull the trigger. The trigger bar goes forward and pushes the sear out from under the hammer, which trips and smacks into the firing pin. Simple, right? There are a few other things going on in there, but really that's about it.
First, let's get oriented. Try to memorize the name of each part.
From surplusrifle.com we have this image of the trigger group broken all the way down:

1: Hammer
2: Hammer Strut
3: Hammer Spring
4: Trigger Spring
5: Trigger Bar (TB)
6: Disconnector
7: Safety Catch
8: Safety Catch Spring
9: Rebound Disconnector
10: Sear
11: Latch/Sear Spring
12: Cover Latch
13: Trigger Guard
14: Trigger
15: Latch Stop Pin
16: Disconnector Hinge Pin
17: Trigger Pin
18: Safety Catch Pin
19: Trigger Bar Pin
And here we see the genuine article, fully assembled

First things first: The first thing you do when working on an SKS or any other firearm is verify that it is unloaded. Put the safety to ON. Pull the magazine release (cover latch) and let any cartridges inside drop free. Close the magazine. Pull the bolt all the way back and let it catch on the magazine. If there is a chambered round, it should eject as the bolt is pulled back. You should be looking at something like this:

Now look away, blink a few times, set down the rifle and wiggle your fingers. Pick up the rifle and look at it again. It should still look like this:
NOTE: there is NO cartridge in the chamber. Verify this to be the case by looking again, putting your finger into the chamber, looking again, and then looking again. You should still see this:
Okay, so it's unloaded, right? Somebody is still going to shoot themselves, or someone else, or an innocent wall/floor/ceiling/television, after supposing that they have completed the aforementioned procedure. Don't let it be YOU.
Okay, next a word about the safety on the SKS: it doesn't have one. Yes, there is a lever that does prevent the trigger being pulled very far. If you have not verified for yourself that it is functional, your rifle does NOT have a safety. Look for yourself:

Nevermind the extraneous c in cOFF, I fat-fingered it when I did these photos!
All the safety lever does is clearly illustrated in the photo. It prevents the trigger moving backwards very far. If you screw up one of the steps below, or if someone else did before you got the rifle, the safety is not necessarily functional to the extent of preventing the weapon from actually firing. Don't worry, we'll cover that in due course.
Okay, next a word about the safety OF the SKS: it is entirely possible to have an accidental discharge with an SKS rifle. A 14 year-old boy in California was killed when he was out hunting with his daddy and the rifle discharged into the boy's head when the trigger had not been operated. The boy closed the bayonet and the shock caused the rifle to fire.
This is possible due to the nature of the beast. When the rifle has what is known as negative hammer/sear engagement, it is an accident waiting to happen. The bottom of the hammer is held motionless against the top of the sear by the pressure of the hammer spring. If the slope on top of the sear is tilted toward the hammer, the hammer will slip a little bit every time the rifle is bumped or jarred hard enough. Eventually, the hammer will fall and fire the weapon. If a cartridge is in the chamber and you aren't following rule #2, somebody could get killed dead. If the angle on top of the sear tilts toward the sear's body, the hammer actually moves AWAY from firing, and if there is a flat surface, the hammer stays still. These are known as Negative, Positive, and Neutral engagement, respectively. You want either Positive or Neutral engagement, for safety.
Why would anyone want/make/have a rifle with negative hammer/sear engagement? Well, for one thing, it makes the trigger pull lighter. If some Bubba only wanted a lighter trigger, that could be one reason you have negative engagement. It also is a simple mistake to make. One slip with a big file or a grinding wheel, and you go from completely safe to very dangerous in one motion. These rifles were made in huge numbers by people not as concerned with quality control as, say, the folks at Springfield or Smith & Wesson. It might have ALWAYS been that way. Anyhow, you want to fix it. But how do you know if you have a rifle with negative engagement? Let's check that right now!
Your rifle is unloaded, right? Check it again. Seriously, I'll wait.
Okay, with the SKS UNLOADED, release the magazine by pulling back the catch and pull the bolt back and release the bolt handle, letting it fly forward. The crashing of the bolt into the breech should not have caused the action to fire. Hit it with the palm of your hand. Hit it with a rubber mallet. Smash it butt-down on the floor as hard as you dare without killing the finish on the stock. Most of you will feel silly. A few of you will have a rifle that made a characteristic, loud, CLACK! If it discharged, you likely have negative engagement. If it fired, you definitely heard it and are probably now standing there with a changed expression on your face. Don't worry. If it didn't discharge, you are not done. Remove the receiver cover. Cock the action. Look at the hammer and pull the trigger. Do it again. Did the hammer move? Yes it did, try again. Keep looking closely at the hammer while holding the rifle still and pulling the trigger very slowly. If the hammer moves away from the bolt, that is positive engagement and you are in good shape for now. If it stayed absolutely still, you have neutral engagement and are in good shape for now. If it moved ever so slightly (thousandths of an inch, folks, it is sometimes hard to see) toward the bolt, that is negative engagement and a problem. Your rifle will be nominally dangerous to carry around with a chambered round, regardless of the safety selector's position.
While you were pulling the trigger slowly, you may have noticed a few things:
It took some distance pulling the trigger before the trigger started working
Once the trigger started working, it got rough. Anywhere from dragging across gravel, to jumpy, to fine sandpaper, rough.
We'll work on that, also.
With safety on, push the button behind the trigger guard with a phillips screwdriver or some other blunt-pointed tool. If it's not going, flip the safety or push harder. That's how it pops out, trust me. If you pushed hard enough with the safety in the proper position, the trigger group fell out in your hand.

Speaking of your hand, have you ever heard of garand thumb? The SKS has an operation like that, also. If you have a cocked trigger group and fire the action the way it seems logical to do, you will find out all about it. The second time, you will either never do it again, or you will do it with something else on the disconnector besides your thumb.

See that second photo? Yeah, the screwderiver is where your thumb would be if you failed to make that one last cognitive connection. Ask me how I know. The silver lining is that there are a lot of dead communists that had the same thing happen to them. Using something ELSE, besides your thumb, press down on the disconnector until the trigger bar lines up with the sear, and pull the trigger. The action will jump a little and you will be holding a decocked trigger group. How do you know when it's lined up? simple: you look.

We'll get back to that image in a little while. If you like the idea of having less potential energy next to your fingers, go ahead and fire the trigger group.
If you have three hands, skip this step.
Put a zip-tie through the trigger guard and tighten it around the magazine catch, pulling the catch back enough to let it off the retaining pin.
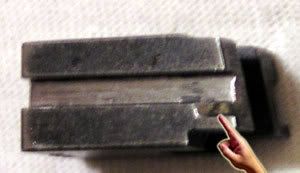
The sound you heard was someone who has been in there before and not used a zip-tie, and watched the sear spring go flying across the room. He slapped himself on the forehead just now. Take a small punch and a gently-swung hammer and drive the latch stop pin out of the frame. Gently. I said gently! What, you bent the rails and the catch won't come out?

Just straighten it out. carefully.
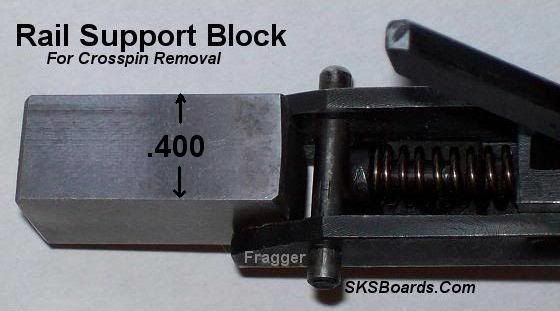
SKSBoards.com user Fragger pointed out that the rails being bent could be a source of a functional problem or safety concern. If the sear gets stuck or the cross pin gets bound up, that could be anything from annoying to dangerous. The following image is his way of preventing the front rails in a trigger group from bending when you go to drive the cross pin in or out: a 0.4" wide block of metal to hold the rails apart. The material doesn't matter, nor does the shape, as long as the block holds the rails apart while you are hammering (gently!) on the cross pin.
Remove the cross pin, magazine catch, and sear spring. When reassembly time comes, don't guess, look here: it all goes back together like the last photo shows:
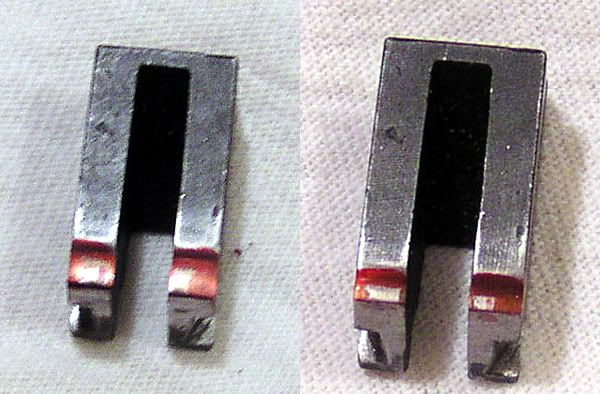
Cock the hammer by pulling it back, and then pull a little farther to release the sear. The sear should come out fairly easily. This is a close-up of a sear, for those with older eyes ;)

The rails on the frame mate with the slots on the sides of the sear, which is pushed down in the trigger group by the hammer, under force of the hammer spring. You want to polish the rails and the slots where the load is borne, as well as lightly smooth off any rough spots on the sides of the sear and insides of the rails.

The hammer slips on the top of the sear, so polish the top of the sear and bottom sear-contact surface of the hammer as well. The hammer is tough to get out. This is how I did it:

That's all there is to smoothing the SKS trigger. Really, that's about it, plus a small quantity of your favorite gun oil at the friction surfaces. You are looking to make things smooth, not to change geometry. If you are using something less than 400 grit sand paper you are probably removing too much metal and/or leaving a too-rough finish. I used some very small files and 600 & 1200 grit wet sand paper for this activity. once you have smoothed everything I pointed out, take your 600 grit or a fine whetstone and very lightly "break" the sharp edges so you have consistent corners. Also, wherever possible, make your polishing motions in the same direction as the parts move against each other.
Your trigger is now about as smooth as it's going to get. I did this once and just polished the high points (the "before" is actually the "after" of my first time through here) and there were a few catches in the trigger pull as a result. This time through, I actually made it smooth. Another thing I did was gamble.
The firing pin in my rifle would hit russian military surplus ammunition primers (which are notoriously hard primers) hard enough to deform them, with a firing pin impression in the primer at least 1.5 millimeters deep. Since the force of the hammer spring pushing on the sear adds to the weight of the trigger pull, I took the advice of some other folks out there and clipped a full turn off the end of the spring, then ground it flat. I used heavy duty wire cutting pliers to cut the spring. Grinding the end of the spring flat is harder than it sounds, and looks something like this:

It was impossible to catch a glimpse during hammer removal, since the hammer moved out of place pretty fast when I pulled it using the above method, but this is the relationship of the hammer and the disconnector:

you might want to smooth out that contact point just a little also, but I left it and probably won't go back in to do it. Now the travel is smoother and very slightly lighter.
It will make your life slightly easier if you take out the trigger spring at this point. This involved an assortment of small prying and grabbing tools and about 5 minutes for me. It is a hassle but it lets things move more easily while you are working.
Next?
Shorter!
Look again at the sear. The finger is pointing to the part we will deal with next.
and then look at what keeps the sear from moving too far back into the trigger group:

The angle on the back of the sear that mates with this tiny stop is what gives the SKS a mile-long 1st stage trigger pull. If you are careful to maintain the angle so that it still mates consistently (failure to maintain the angle may result in an unsafe weapon after a few hundred rounds fired), you can shorten the trigger's travel prior to the point where it begins to push the sear. You are making the gap between the trigger bar and the sear (below) shorter. Do this carefully. You want to make sure that the safety is not rendered useless.

The trigger can move a little when the safety is ON. That moves the trigger bar closer to the sear. You can look in the hole in the side of the frame to verify this clearance. For safety, you want to leave about 0.050" to 0.060" clearance between the sear and trigger bar when the trigger is pulled back HARD with the safety on. If the trigger can push the sear with the safety on, this clearance is too small and your rifle might be less safe than it could be.
You wanted to eliminate the first stage altogether? Remember what you are dealing with. It is not a match-grade target rifle and never will be. It is a battle rifle, and acceptable accuracy is minute-of-head, not minute-of-angle. Do you really want that chintzy safety lever to be the only second chance you get? The first stage is there to give you time to realize that you are about to send 124 grains out the muzzle at 2400FPS. You can un-pull a first stage without moving the sear a millimeter, but you can't unfire a bullet. Leave a little first stage travel. The improvement in your trigger, even with some first stage left in there, will still be surprisingly large next time you go shooting.
Next: safety!
Have a look at this:

Make a note of where the sear sits under the hammer when the trigger is cocked. Make a line with a fine sharpie if you want. You want the angle on top of the sear from the rear edge to that line, to open up toward that line. The sear, set on a level surface and viewed from the side, should have a very small depression that the hammer falls INTO when the weapon receives a shock. If the angle opens up toward the rear of the sear, the hammer can fall without pulling the trigger. You don't want that to happen. Look again:
That is not a big depression. If you have altered the 1st stage length of pull as described above, you have altered the geometry of the hammer/sear engagement. Verify the sear-hammer engagement again. I didn't do this step last the first time I worked on this trigger and I had to repeat this step to get back to neutral. Take a very fine file or a screwdriver with 600 grit sandpaper wrapped around it, and make the angle correct. Polish it and break the corner. Verify that you now have neutral or preferably positive engagement. If you had negative engagement before, you will possibly have a slightly heavier trigger pull because you are now pulling the hammer UP the sear instead of having it slide DOWN the unsafe angle off the back of the sear. That slightly heavier trigger is a Good Thing. If it is really too heavy and you are shooting exclusively civilian/commercial ammunition (with soft primers), you might want to get some reduced-power springs from Wolf, but I didn't consider it worth even the small amount of cash for new springs, just to have a lighter trigger on a battle rifle.
Okay, now that you are finished changing the parts' geometry, let's go back to safety for a few minutes. The hammer is not supposed to be able to fall if the bolt is not all the way forward ("fire out of battery"). IF it can, and IF your firing pin gets jammed forward, you may just be a dead camper, let alone unhappy. If the SKS fires out of battery, you will have a little gap around the back of the firing chamber that will let out tens of thousands of pounds of pressure per square inch through the side of a shell casing. The results might range from a nasty surprise, to case head separation (and a stuck casing in the chamber), to spontaneous auto-dismantling of your rifle at high velocity, in near proximity to your head. Does that sound like fun to you? No? Me neither.
The bolt, when it goes into battery, pushes the disconnector down, and the hammer is free to fall when you pull the trigger. Every thing you did to change the geometry of the parts in the trigger group, including just polishing the sear rails, lets the hammer forward just a little tiny bit more, either by lowering the sear in the trigger group housing, or lowering the contact point where the sear meets the hammer, or by raising the contact point where the hammer meets the sear. When the hammer moves forward, its relationship with the disconnector changes. After the last trigger work I did on my rifle, the disconnector was NOT working properly and I didn't know it until I paid a visit to Captain of a Crew of One and saw the video (linked below) that Curt made up.
When the trigger group is assembled and cocked, the disconnector should be free to move without touching its corresponding notch on the bottom of the hammer at all. You don't have to have the springs installed to test disconnector function, which makes this part of an SKS trigger job easier. Reassemble the trigger group less the sear and hammer springs. Orient the trigger group so it is vertical, like it would be in an assembled rifle. Pull the hammer back to cock the action. Push in on the sear, and push up on the hammer with your fingers to simulate the springs. Now jiggle the disconnector. If you can feel it rubbing the notch on the bottom of the hammer, you have work to do. If not, you're not out of the woods yet. Position the disconnector so it lets the trigger bar contact the sear, and pull the trigger a little, hard enough to hold the trigger bar on the sear without pushing the sear out from under the hammer. Now release the disconnector. Pull the trigger to fire the action (remember you are pretending to be springs, and the hammer will move off your finger - don't be discouraged if it disassembles itself a few times while you do this testing). The hammer should rise and then catch on the disconnector. If it did, it worked right. You just simulated an attempt to fire your rifle out of battery.
If you didn't feel the disconnector rubbing on the bottom of the hammer in the previous test, you are now out of the woods. The geometry of your trigger group is still "close enough" to allow your disconnector to work properly.
If the disconnector does not engage the hammer in the last test, or if you feel it rubbing on the hammer in the test before, look closely at these images:
Those show: the hammer caught on the disconnector, the 'stock' before and modified 'after' condition of my disconnector. Note: the notch on the disconnector that catches the hammer is tiny and you probably only need to make a tiny change to it. As shown in the photos, I used a jeweler's file to open the notch up toward the right. Go very slowly and test-fire the trigger group often. If your disconnector didn't engage at all before, you will feel it start to engage as your work progresses. Do NOT stop there. If it engages but rubs, you need to keep filing until it does not touch the hammer AT ALL when the trigger is cocked.
Okay, so you're back to as safe as an SKS trigger can get. There is one more problem that Curt shows you how to solve in his video: The trigger is still creepy. Mine had about 1/4" of creep to it, between the point where the sear was contacted, and the point where the hammer fell. This of course is not good for target shooting, be the target paper, deer, or Goblin. You want that second stage of trigger travel to be shorter.
You are going to change the geometry of the sear again. BE CAREFUL not to touch that part of the sear which is touched by the trigger bar, or you are literally working against yourself. Here is a before/after shot, showing the point of trigger bar contact on the sear:
ALL the work you are about to do needs to be done above that point of contact.
Have a look at my sear from a different perspective. I marked the hammer engagement surface with a sharpie and fired the trigger a few times so you can see where the hammer rubs the sear. This is before and after the work you are about to read about.
And finally look at the angles involved:

The length of the hammer contact surface on top of the sear is what determines how long your trigger's second stage travel will be. Reducing the distance the hammer slides along the top of the sear reduces trigger creep.
At this point, if you used a marker to show yourself where the hammer rides on the sear, you may have noticed that the hammer does not have a flat contact with the sear. Look at the right side of my sear. Only about half of it is touching the bottom of the hammer. This is nominally a problem, and now is the time to sand down the hammer or sear until you get more of the hammer touching more of the sear. These parts rub together pretty hard. The more of the hammer you can get rubbing on the sear, the lower the overall force per unit of area will be, and the less wear will occur.
I used a jeweler's file on this part of the job and more than once wished for a bench grinder, it took so long. Don't do it. One slip and you need to redo a lot of work, or you need a new sear and you'll have to do it all over again. Just go slowly, and reassemble the trigger every once in a while to check your progress. The amount of creep in my trigger was reduced by about half, which makes sense if you consider about half of the hammer engagement surface was removed. By this time, I was starting to get a little freaked out at the amount of material coming off the sear. I called it good right there. Be careful not to go too far;removing too much material at this point will make your rifle a display piece. If your hammer has zero engagement with the sear, it will never stay cocked. That means either the action will never fire, or it will fire 100% of the time as soon as the bolt closes. I am NOT sure if the rifle would fire as the bolt closes; I only mention it because if it did then this is a dangerous condition! If you are just charging the rifle, and it fires, the rifle will quite possibly remove itself from your hands. I don't know about you, but I usually charge my rifle with a slightly lighter grip than I use when firing. Just imagine what would happen to you if it fired when you were holding it with that loose grip. Or your child. This is NOT the way to convert an SKS to automatic operation. As far as I know, there is NO WAY to convert an SKS to a machine gun. The Chinese tried it and it worked so poorly, and reliability was so bad, they used the AK-47 instead. All removing too much material from the sear/hammer interface could do is remove your control over when the rifle fires. This is not select-fire, this is DANGEROUS. Do not remove too much material from the engagement surface. You have been warned.
You're done. Your SKS has a trigger that is now
Smoother
Lighter
Shorter
Safer
Pat yourself on the back. Clean it all out. Put some lubricant on it. Wipe off excess lubricant to prevent fouling from dirt/lint and spent powder. Curt recommends using a cold blue touch-up on the now-raw metal surfaces. I leave my rifles oiled, and shoot/oil them every few months. It has been (checking my watch) just over a year now and there is no sign of rust anywhere in my trigger group.
Put it all back together. If you didn't cut the zip-tie, put it back on the catch to hold it while you drive the pin back in to the rails. One final note:

You want the catch pin centered in the frame. Don't leave it poking out more on one side.
You're done. Reassemble your rifle and verify the engagement is now neutral or positive one last time and dry fire the weapon a few times.
One last word and then I'm through.
Some people like their guns to work because somebody else made them work. That is fine. If you don't want to do the above described work, by all means DON'T! There are several people who will do it for you who frequent the SKS boards but I'm not sure it would be right to recommend one over the other. I haven't heard anybody say they were unsatisfied with any of their work. Cost will range from free to less than a hundred dollars. If you do not want to D.I.Y. or deal with any of them, email me.
Edit/update:
Sailor Curt has made a video to show what he did to his trigger group. The techniques may vary, the tools, hands, and sear will vary, but the important part is the geometry of your parts as they leave the shop. It's 45 minutes long, broken up into a few segments for youtube posting, and not exactly as action packed as, say, heat but it's worth a watch. There is also a pretty large .mp4 file of the whole thing available for downloading.
From the video, I have a few take-away points for myself:
He shows how to fire the hammer without using a tool or smashing your hand. It's worth watching just to see that.
If you want to see a dramatic example of HUGELY negative hammer/sear engagement, the video has it. That sear is as bad as I have ever seen.
DISCLAIMER: On this page, I tell you how to improve the trigger on an SKS (Simonov) rifle. If you choose to do what I tell you how to do here, you do so at your own risk. This page is presented for informational purposes only and you bear full responsibility for any legal liability, property damage, injury, or death that may occur because you messed up your rifle. If you know someone who will undertake to do this work for you, the majority of it could be done if you sent only the complete trigger group, without sending the FFL-required receiver or a whole weapon. If you want ME to do this labor for you, my contact information is at the bottom of this page.
The work shown/described below was done on a Chinese (Norinco) SKS manufactured some time around 1968, but your SKS's action should be very similar. The trigger job is almost exactly the same, whether your rifle is a Chinese, Russian, Yugoslavian, Romanian, Albanian, or whatever other country decided to make copies of the SKS. They are all pretty close to the same with only very minor variation, when it comes to the trigger group.
This page was last updated 09/16/2011, with minor changes to clarify the text.
Click on any image to see it MUCH CLEARER, full-size; Google reduces the quality of the images on this page to speed page loads
The SKS pattern rifle, for what it is, is nearly perfect. You can make it cheap, abuse and neglect it, pick it up out of the dirt and it will fire with 100% reliability. There is no magazine to lose, and cleaning is largely optional. If what you are after is cover and general fire at the other side, the SKS is perfect in large numbers. Throw an AK or two in the mix, and you have an ugly situation for the imperialist dogs (just ask a veteran who's been on that other side). However, if you are wanting to kill a specific capitalist pig, or, say, a paper Osama or a Zombie, from a distance, then the accuracy of the SKS rifle could usually use some improvement. If you want to go burn off some steam and a few hundred rounds of 7.62x39, your trigger finger muscles will be getting tired and your friend with the AR will laugh at you because the stock trigger on most SKSs is:
With care, all of these can be largely remedied by a first time home gunsmith (i.e., you). You'll need some hand tools and abrasives, and that's about it. The operation of the trigger group is fairly simple. Charge the trigger by pulling back the hammer, depress the disconnector appropriately, pull the trigger. The trigger bar goes forward and pushes the sear out from under the hammer, which trips and smacks into the firing pin. Simple, right? There are a few other things going on in there, but really that's about it.
First, let's get oriented. Try to memorize the name of each part.
From surplusrifle.com we have this image of the trigger group broken all the way down:

1: Hammer
2: Hammer Strut
3: Hammer Spring
4: Trigger Spring
5: Trigger Bar (TB)
6: Disconnector
7: Safety Catch
8: Safety Catch Spring
9: Rebound Disconnector
10: Sear
11: Latch/Sear Spring
12: Cover Latch
13: Trigger Guard
14: Trigger
15: Latch Stop Pin
16: Disconnector Hinge Pin
17: Trigger Pin
18: Safety Catch Pin
19: Trigger Bar Pin
And here we see the genuine article, fully assembled

First things first: The first thing you do when working on an SKS or any other firearm is verify that it is unloaded. Put the safety to ON. Pull the magazine release (cover latch) and let any cartridges inside drop free. Close the magazine. Pull the bolt all the way back and let it catch on the magazine. If there is a chambered round, it should eject as the bolt is pulled back. You should be looking at something like this:

Now look away, blink a few times, set down the rifle and wiggle your fingers. Pick up the rifle and look at it again. It should still look like this:
NOTE: there is NO cartridge in the chamber. Verify this to be the case by looking again, putting your finger into the chamber, looking again, and then looking again. You should still see this:
Okay, so it's unloaded, right? Somebody is still going to shoot themselves, or someone else, or an innocent wall/floor/ceiling/television, after supposing that they have completed the aforementioned procedure. Don't let it be YOU.
Okay, next a word about the safety on the SKS: it doesn't have one. Yes, there is a lever that does prevent the trigger being pulled very far. If you have not verified for yourself that it is functional, your rifle does NOT have a safety. Look for yourself:

Nevermind the extraneous c in cOFF, I fat-fingered it when I did these photos!
All the safety lever does is clearly illustrated in the photo. It prevents the trigger moving backwards very far. If you screw up one of the steps below, or if someone else did before you got the rifle, the safety is not necessarily functional to the extent of preventing the weapon from actually firing. Don't worry, we'll cover that in due course.
Okay, next a word about the safety OF the SKS: it is entirely possible to have an accidental discharge with an SKS rifle. A 14 year-old boy in California was killed when he was out hunting with his daddy and the rifle discharged into the boy's head when the trigger had not been operated. The boy closed the bayonet and the shock caused the rifle to fire.
This is possible due to the nature of the beast. When the rifle has what is known as negative hammer/sear engagement, it is an accident waiting to happen. The bottom of the hammer is held motionless against the top of the sear by the pressure of the hammer spring. If the slope on top of the sear is tilted toward the hammer, the hammer will slip a little bit every time the rifle is bumped or jarred hard enough. Eventually, the hammer will fall and fire the weapon. If a cartridge is in the chamber and you aren't following rule #2, somebody could get killed dead. If the angle on top of the sear tilts toward the sear's body, the hammer actually moves AWAY from firing, and if there is a flat surface, the hammer stays still. These are known as Negative, Positive, and Neutral engagement, respectively. You want either Positive or Neutral engagement, for safety.
Why would anyone want/make/have a rifle with negative hammer/sear engagement? Well, for one thing, it makes the trigger pull lighter. If some Bubba only wanted a lighter trigger, that could be one reason you have negative engagement. It also is a simple mistake to make. One slip with a big file or a grinding wheel, and you go from completely safe to very dangerous in one motion. These rifles were made in huge numbers by people not as concerned with quality control as, say, the folks at Springfield or Smith & Wesson. It might have ALWAYS been that way. Anyhow, you want to fix it. But how do you know if you have a rifle with negative engagement? Let's check that right now!
Your rifle is unloaded, right? Check it again. Seriously, I'll wait.
Okay, with the SKS UNLOADED, release the magazine by pulling back the catch and pull the bolt back and release the bolt handle, letting it fly forward. The crashing of the bolt into the breech should not have caused the action to fire. Hit it with the palm of your hand. Hit it with a rubber mallet. Smash it butt-down on the floor as hard as you dare without killing the finish on the stock. Most of you will feel silly. A few of you will have a rifle that made a characteristic, loud, CLACK! If it discharged, you likely have negative engagement. If it fired, you definitely heard it and are probably now standing there with a changed expression on your face. Don't worry. If it didn't discharge, you are not done. Remove the receiver cover. Cock the action. Look at the hammer and pull the trigger. Do it again. Did the hammer move? Yes it did, try again. Keep looking closely at the hammer while holding the rifle still and pulling the trigger very slowly. If the hammer moves away from the bolt, that is positive engagement and you are in good shape for now. If it stayed absolutely still, you have neutral engagement and are in good shape for now. If it moved ever so slightly (thousandths of an inch, folks, it is sometimes hard to see) toward the bolt, that is negative engagement and a problem. Your rifle will be nominally dangerous to carry around with a chambered round, regardless of the safety selector's position.
While you were pulling the trigger slowly, you may have noticed a few things:
We'll work on that, also.
With safety on, push the button behind the trigger guard with a phillips screwdriver or some other blunt-pointed tool. If it's not going, flip the safety or push harder. That's how it pops out, trust me. If you pushed hard enough with the safety in the proper position, the trigger group fell out in your hand.

Speaking of your hand, have you ever heard of garand thumb? The SKS has an operation like that, also. If you have a cocked trigger group and fire the action the way it seems logical to do, you will find out all about it. The second time, you will either never do it again, or you will do it with something else on the disconnector besides your thumb.

See that second photo? Yeah, the screwderiver is where your thumb would be if you failed to make that one last cognitive connection. Ask me how I know. The silver lining is that there are a lot of dead communists that had the same thing happen to them. Using something ELSE, besides your thumb, press down on the disconnector until the trigger bar lines up with the sear, and pull the trigger. The action will jump a little and you will be holding a decocked trigger group. How do you know when it's lined up? simple: you look.

We'll get back to that image in a little while. If you like the idea of having less potential energy next to your fingers, go ahead and fire the trigger group.
If you have three hands, skip this step.
Put a zip-tie through the trigger guard and tighten it around the magazine catch, pulling the catch back enough to let it off the retaining pin.
The sound you heard was someone who has been in there before and not used a zip-tie, and watched the sear spring go flying across the room. He slapped himself on the forehead just now. Take a small punch and a gently-swung hammer and drive the latch stop pin out of the frame. Gently. I said gently! What, you bent the rails and the catch won't come out?

Just straighten it out. carefully.
SKSBoards.com user Fragger pointed out that the rails being bent could be a source of a functional problem or safety concern. If the sear gets stuck or the cross pin gets bound up, that could be anything from annoying to dangerous. The following image is his way of preventing the front rails in a trigger group from bending when you go to drive the cross pin in or out: a 0.4" wide block of metal to hold the rails apart. The material doesn't matter, nor does the shape, as long as the block holds the rails apart while you are hammering (gently!) on the cross pin.

Remove the cross pin, magazine catch, and sear spring. When reassembly time comes, don't guess, look here: it all goes back together like the last photo shows:
Cock the hammer by pulling it back, and then pull a little farther to release the sear. The sear should come out fairly easily. This is a close-up of a sear, for those with older eyes ;)

The rails on the frame mate with the slots on the sides of the sear, which is pushed down in the trigger group by the hammer, under force of the hammer spring. You want to polish the rails and the slots where the load is borne, as well as lightly smooth off any rough spots on the sides of the sear and insides of the rails.

The hammer slips on the top of the sear, so polish the top of the sear and bottom sear-contact surface of the hammer as well. The hammer is tough to get out. This is how I did it:

That's all there is to smoothing the SKS trigger. Really, that's about it, plus a small quantity of your favorite gun oil at the friction surfaces. You are looking to make things smooth, not to change geometry. If you are using something less than 400 grit sand paper you are probably removing too much metal and/or leaving a too-rough finish. I used some very small files and 600 & 1200 grit wet sand paper for this activity. once you have smoothed everything I pointed out, take your 600 grit or a fine whetstone and very lightly "break" the sharp edges so you have consistent corners. Also, wherever possible, make your polishing motions in the same direction as the parts move against each other.
Your trigger is now about as smooth as it's going to get. I did this once and just polished the high points (the "before" is actually the "after" of my first time through here) and there were a few catches in the trigger pull as a result. This time through, I actually made it smooth. Another thing I did was gamble.
The firing pin in my rifle would hit russian military surplus ammunition primers (which are notoriously hard primers) hard enough to deform them, with a firing pin impression in the primer at least 1.5 millimeters deep. Since the force of the hammer spring pushing on the sear adds to the weight of the trigger pull, I took the advice of some other folks out there and clipped a full turn off the end of the spring, then ground it flat. I used heavy duty wire cutting pliers to cut the spring. Grinding the end of the spring flat is harder than it sounds, and looks something like this:

It was impossible to catch a glimpse during hammer removal, since the hammer moved out of place pretty fast when I pulled it using the above method, but this is the relationship of the hammer and the disconnector:

you might want to smooth out that contact point just a little also, but I left it and probably won't go back in to do it. Now the travel is smoother and very slightly lighter.
It will make your life slightly easier if you take out the trigger spring at this point. This involved an assortment of small prying and grabbing tools and about 5 minutes for me. It is a hassle but it lets things move more easily while you are working.
Next?
Shorter!
Look again at the sear. The finger is pointing to the part we will deal with next.

and then look at what keeps the sear from moving too far back into the trigger group:

The angle on the back of the sear that mates with this tiny stop is what gives the SKS a mile-long 1st stage trigger pull. If you are careful to maintain the angle so that it still mates consistently (failure to maintain the angle may result in an unsafe weapon after a few hundred rounds fired), you can shorten the trigger's travel prior to the point where it begins to push the sear. You are making the gap between the trigger bar and the sear (below) shorter. Do this carefully. You want to make sure that the safety is not rendered useless.

The trigger can move a little when the safety is ON. That moves the trigger bar closer to the sear. You can look in the hole in the side of the frame to verify this clearance. For safety, you want to leave about 0.050" to 0.060" clearance between the sear and trigger bar when the trigger is pulled back HARD with the safety on. If the trigger can push the sear with the safety on, this clearance is too small and your rifle might be less safe than it could be.
You wanted to eliminate the first stage altogether? Remember what you are dealing with. It is not a match-grade target rifle and never will be. It is a battle rifle, and acceptable accuracy is minute-of-head, not minute-of-angle. Do you really want that chintzy safety lever to be the only second chance you get? The first stage is there to give you time to realize that you are about to send 124 grains out the muzzle at 2400FPS. You can un-pull a first stage without moving the sear a millimeter, but you can't unfire a bullet. Leave a little first stage travel. The improvement in your trigger, even with some first stage left in there, will still be surprisingly large next time you go shooting.
Next: safety!
Have a look at this:

Make a note of where the sear sits under the hammer when the trigger is cocked. Make a line with a fine sharpie if you want. You want the angle on top of the sear from the rear edge to that line, to open up toward that line. The sear, set on a level surface and viewed from the side, should have a very small depression that the hammer falls INTO when the weapon receives a shock. If the angle opens up toward the rear of the sear, the hammer can fall without pulling the trigger. You don't want that to happen. Look again:
That is not a big depression. If you have altered the 1st stage length of pull as described above, you have altered the geometry of the hammer/sear engagement. Verify the sear-hammer engagement again. I didn't do this step last the first time I worked on this trigger and I had to repeat this step to get back to neutral. Take a very fine file or a screwdriver with 600 grit sandpaper wrapped around it, and make the angle correct. Polish it and break the corner. Verify that you now have neutral or preferably positive engagement. If you had negative engagement before, you will possibly have a slightly heavier trigger pull because you are now pulling the hammer UP the sear instead of having it slide DOWN the unsafe angle off the back of the sear. That slightly heavier trigger is a Good Thing. If it is really too heavy and you are shooting exclusively civilian/commercial ammunition (with soft primers), you might want to get some reduced-power springs from Wolf, but I didn't consider it worth even the small amount of cash for new springs, just to have a lighter trigger on a battle rifle.
Okay, now that you are finished changing the parts' geometry, let's go back to safety for a few minutes. The hammer is not supposed to be able to fall if the bolt is not all the way forward ("fire out of battery"). IF it can, and IF your firing pin gets jammed forward, you may just be a dead camper, let alone unhappy. If the SKS fires out of battery, you will have a little gap around the back of the firing chamber that will let out tens of thousands of pounds of pressure per square inch through the side of a shell casing. The results might range from a nasty surprise, to case head separation (and a stuck casing in the chamber), to spontaneous auto-dismantling of your rifle at high velocity, in near proximity to your head. Does that sound like fun to you? No? Me neither.
The bolt, when it goes into battery, pushes the disconnector down, and the hammer is free to fall when you pull the trigger. Every thing you did to change the geometry of the parts in the trigger group, including just polishing the sear rails, lets the hammer forward just a little tiny bit more, either by lowering the sear in the trigger group housing, or lowering the contact point where the sear meets the hammer, or by raising the contact point where the hammer meets the sear. When the hammer moves forward, its relationship with the disconnector changes. After the last trigger work I did on my rifle, the disconnector was NOT working properly and I didn't know it until I paid a visit to Captain of a Crew of One and saw the video (linked below) that Curt made up.
When the trigger group is assembled and cocked, the disconnector should be free to move without touching its corresponding notch on the bottom of the hammer at all. You don't have to have the springs installed to test disconnector function, which makes this part of an SKS trigger job easier. Reassemble the trigger group less the sear and hammer springs. Orient the trigger group so it is vertical, like it would be in an assembled rifle. Pull the hammer back to cock the action. Push in on the sear, and push up on the hammer with your fingers to simulate the springs. Now jiggle the disconnector. If you can feel it rubbing the notch on the bottom of the hammer, you have work to do. If not, you're not out of the woods yet. Position the disconnector so it lets the trigger bar contact the sear, and pull the trigger a little, hard enough to hold the trigger bar on the sear without pushing the sear out from under the hammer. Now release the disconnector. Pull the trigger to fire the action (remember you are pretending to be springs, and the hammer will move off your finger - don't be discouraged if it disassembles itself a few times while you do this testing). The hammer should rise and then catch on the disconnector. If it did, it worked right. You just simulated an attempt to fire your rifle out of battery.
If you didn't feel the disconnector rubbing on the bottom of the hammer in the previous test, you are now out of the woods. The geometry of your trigger group is still "close enough" to allow your disconnector to work properly.
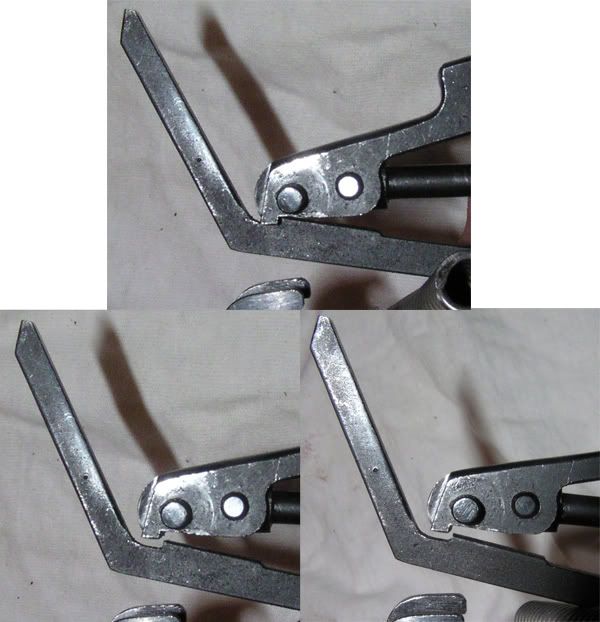
If the disconnector does not engage the hammer in the last test, or if you feel it rubbing on the hammer in the test before, look closely at these images:

Those show: the hammer caught on the disconnector, the 'stock' before and modified 'after' condition of my disconnector. Note: the notch on the disconnector that catches the hammer is tiny and you probably only need to make a tiny change to it. As shown in the photos, I used a jeweler's file to open the notch up toward the right. Go very slowly and test-fire the trigger group often. If your disconnector didn't engage at all before, you will feel it start to engage as your work progresses. Do NOT stop there. If it engages but rubs, you need to keep filing until it does not touch the hammer AT ALL when the trigger is cocked.
Okay, so you're back to as safe as an SKS trigger can get. There is one more problem that Curt shows you how to solve in his video: The trigger is still creepy. Mine had about 1/4" of creep to it, between the point where the sear was contacted, and the point where the hammer fell. This of course is not good for target shooting, be the target paper, deer, or Goblin. You want that second stage of trigger travel to be shorter.
You are going to change the geometry of the sear again. BE CAREFUL not to touch that part of the sear which is touched by the trigger bar, or you are literally working against yourself. Here is a before/after shot, showing the point of trigger bar contact on the sear:

ALL the work you are about to do needs to be done above that point of contact.
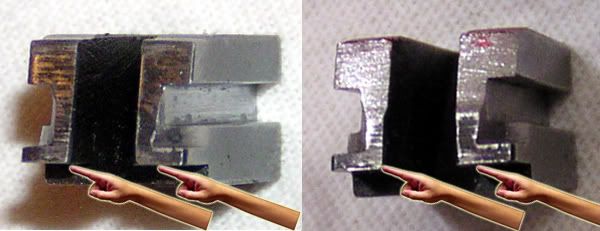
Have a look at my sear from a different perspective. I marked the hammer engagement surface with a sharpie and fired the trigger a few times so you can see where the hammer rubs the sear. This is before and after the work you are about to read about.

And finally look at the angles involved:

The length of the hammer contact surface on top of the sear is what determines how long your trigger's second stage travel will be. Reducing the distance the hammer slides along the top of the sear reduces trigger creep.
At this point, if you used a marker to show yourself where the hammer rides on the sear, you may have noticed that the hammer does not have a flat contact with the sear. Look at the right side of my sear. Only about half of it is touching the bottom of the hammer. This is nominally a problem, and now is the time to sand down the hammer or sear until you get more of the hammer touching more of the sear. These parts rub together pretty hard. The more of the hammer you can get rubbing on the sear, the lower the overall force per unit of area will be, and the less wear will occur.
I used a jeweler's file on this part of the job and more than once wished for a bench grinder, it took so long. Don't do it. One slip and you need to redo a lot of work, or you need a new sear and you'll have to do it all over again. Just go slowly, and reassemble the trigger every once in a while to check your progress. The amount of creep in my trigger was reduced by about half, which makes sense if you consider about half of the hammer engagement surface was removed. By this time, I was starting to get a little freaked out at the amount of material coming off the sear. I called it good right there. Be careful not to go too far;removing too much material at this point will make your rifle a display piece. If your hammer has zero engagement with the sear, it will never stay cocked. That means either the action will never fire, or it will fire 100% of the time as soon as the bolt closes. I am NOT sure if the rifle would fire as the bolt closes; I only mention it because if it did then this is a dangerous condition! If you are just charging the rifle, and it fires, the rifle will quite possibly remove itself from your hands. I don't know about you, but I usually charge my rifle with a slightly lighter grip than I use when firing. Just imagine what would happen to you if it fired when you were holding it with that loose grip. Or your child. This is NOT the way to convert an SKS to automatic operation. As far as I know, there is NO WAY to convert an SKS to a machine gun. The Chinese tried it and it worked so poorly, and reliability was so bad, they used the AK-47 instead. All removing too much material from the sear/hammer interface could do is remove your control over when the rifle fires. This is not select-fire, this is DANGEROUS. Do not remove too much material from the engagement surface. You have been warned.
You're done. Your SKS has a trigger that is now
Pat yourself on the back. Clean it all out. Put some lubricant on it. Wipe off excess lubricant to prevent fouling from dirt/lint and spent powder. Curt recommends using a cold blue touch-up on the now-raw metal surfaces. I leave my rifles oiled, and shoot/oil them every few months. It has been (checking my watch) just over a year now and there is no sign of rust anywhere in my trigger group.
Put it all back together. If you didn't cut the zip-tie, put it back on the catch to hold it while you drive the pin back in to the rails. One final note:

You want the catch pin centered in the frame. Don't leave it poking out more on one side.
You're done. Reassemble your rifle and verify the engagement is now neutral or positive one last time and dry fire the weapon a few times.
One last word and then I'm through.
Some people like their guns to work because somebody else made them work. That is fine. If you don't want to do the above described work, by all means DON'T! There are several people who will do it for you who frequent the SKS boards but I'm not sure it would be right to recommend one over the other. I haven't heard anybody say they were unsatisfied with any of their work. Cost will range from free to less than a hundred dollars. If you do not want to D.I.Y. or deal with any of them, email me.
Edit/update:
Sailor Curt has made a video to show what he did to his trigger group. The techniques may vary, the tools, hands, and sear will vary, but the important part is the geometry of your parts as they leave the shop. It's 45 minutes long, broken up into a few segments for youtube posting, and not exactly as action packed as, say, heat but it's worth a watch. There is also a pretty large .mp4 file of the whole thing available for downloading.
From the video, I have a few take-away points for myself:
1 Year Later, We Are Still Stupid.
So a year ago, some asshat killed some of his fellow students at Virginia Tech University. No mention of any involvement of psychotropic drugs. No mention of the violation of a gun-free zone. Must have got around the gun-free force field somehow.
I am so astonished that Texas still has places that are gun-free zones that I will be contacting my local and state legislature members today to ask about why we (law abiding citizens) still voluntarily disarm in the places where innocents gather the most densely.
I am so astonished that Texas still has places that are gun-free zones that I will be contacting my local and state legislature members today to ask about why we (law abiding citizens) still voluntarily disarm in the places where innocents gather the most densely.
Tuesday, April 15, 2008
What's On My Nightstand?
Alarm clock
Pile of homeschooling books that just came in for #1 and #2
Notes from my Government course
Random fiction paperback that the wife left there
Big empty spot for the Glock foh-tay to sleep on at night
Doily under it all
I don't know who started it, and I don't much care. I need coffee and I'm grumpy so I'm also not going to link to 5 other bloggers with the same topic on their sites.
haha, not like anyone reads this anyway. (yet?)
One of my uncles suggested pressing the PANIC button on your car alarm keyfob if you hear a suspicious noise in your house. Neat idea, if anybody went and looked when car alarms went off anymore. If I really think a Goblin or other animal is coming around, I'm going to be making a different series of noises that goes something like this:
click CLACK
That is all.
Friday, April 11, 2008
I Have Sand In My Hair.
Deep down. When I scratch my head, there is sand under the fingernails.
I got home from work and saw a sign on the couch written by my five year-old girl that they had "GONE TO PRCK". I hopped in the mommy-mobile and checked the "yellow park" (yellow slides) and they weren't there. I went to the parking lot of the community pool and jogged to the "baby park" where they also weren't. I kept jogging till I got to the "blue park" (guess the slide color) and I saw the Wife&Kids over at the sandbox. I whistled them up and kept whistling as I was walking closer, and then I heard "mumbleDADDY!" and the girl came running. The 4 year-old elderboy stayed put, as it turns out to keep from running barefoot in ant and sticker infested grass, and the girl got a big running-to-her hugs&kisses. They had been playing in the sand at a beach volleyball court. Lilly went for a walk with #3 in the stroller and I was left to play with 1&2. The sand had been rained upon and there were little clumps that could be carefully picked up and thrown, to dissolve on impact with the ground, volleyball net, or family member, where they hit. After a second admonition to my girl (who had been making "sand angels") not to get me dirty with sand, she stopped throwing it at me. Then I struck up a game with the olderboy of 'catching' the clumps. They disslove on contact, remember. Well, the girl found a few and tossed them to me. I batted them down and to both sides into clouds of sand in a most amusing fashion. Then she found one that was bigger than all the rest and tossed it to me. I batted it all right. Straight over my head. The shower of sand was most impressive and went all over me. Apparently, this was about as funny as anything.
And now, hours later,
I have sand in my hair. And a smile on my face.
Wednesday, April 9, 2008
This Should Never, Ever, Ever Happen.
At work (http://www.cdnsystems.com) I use 2 things all day: Windows and Photoshop.
This morning, one of them made the other stop working. Guess which is which?
I couldn't do something I needed to do in Photoshop because Windows blows a fat one. Apparently the automatic updates that it downloaded had something to do with bringing up dialog boxes, and until I installed updates and shut down the system all the way and restarted, it wouldn't give my dialogs in Photoshop. Nice. What if this were a server I needed to be running 24/7? Oh well, you just lose money. Sure, fine, automatic updates off, right. My home computer is set so I tell it when I feel like updating, but this is at work.
Is it really asking so much, to have a computer's operating system not cost me money by forcing me to manually reboot on an automatically downloaded update to a buggy software package? Why is this even a question for me? If Redmond really had their act together, I would never even need to know any updates had been applied.
Transparency: for governments and bug-fix installations.
If I do anything besides shake my head at the Worthless Ones, it will cost me more precious time than it already did to type this up.
Just disgusting.
Sunday, April 6, 2008
Regarding The Flag Lapel Pin Controversy
or,
Why don't I wear an American flag lapel pin?
Because I'm not much of a one for wearing jewelery, that's why. Do you question my patriotism? Shall I likewise question yours? The very lowest scoundrel may wear all the pins and ribands you like, and it changes him not one bit. Does your opinion of him improve, if he wear your preferred trinket? Then you are either a fool or not thinking very hard; neither of these are ways I recommend you to be. Shall I wear our national ensign to show that I am "politically correct"? Bah, humbug.
You can't look inside of me. You can't see how my heart swells with love, pride, and yes very patriotism, when I see those stars & stripes unfurled. Sometimes, when I think of the men who shed their blood to preserve that flag for me; my brothers-in-arms who died, were maimed, were wounded, who went for long years away from their precious wives and beloved children, so that our nation should be preserved for us; I have been known to catch my breath and tear up in gratitude. I thank God for this country, for putting me in it, and preserving it for me. If I don't wear a pin on my breast made by some poor slave in China, then, you will please excuse me, and if it bothers your poor soul, pray for me, brothers, that I should reform my ways. Brother, give me a break.
Are you bent out of shape over an American flag pin missing from my lapel after reading all this? If so, I have a suggestion where you can stick it.
Wednesday, April 2, 2008
Hillary Is Worse Than A Liar.
So, when she said she was under sniper fire, running to cover in Bosnia, she was actually standing, smiling on a tarmac, receiving gifts from a little girl. That's not a lie. That's making stuff up, for you to buy into without asking any inconvenient questions.
Now it comes out (from a first-hand source no less), when she was 27, she was fired for unethical conduct and couldn't get a letter of recommendation. She hid evidence of a sitting president's right to council of an attorney, then wrote a brief to the effect that he didn't have the right to council. Too bad for the nation, Nixon resigned. If he hadn't, and she had submitted the brief, she would have been disbarred and we might not be in the current pickle. That, by the way, is making stuff up, for you to buy into without even the opportunity to find out the inconvenient truth.
Remember: for a Socialist, the State is the highest good. If it is good for the state (as Hillary of course would be (in her own mind anyway)) then it is good, regardless of truth or morality.
That is all.
Subscribe to:
Posts (Atom)

