DISCLAIMER: On this page, I tell you how I improve the triggers on Marlin self-loading carbines. If you choose to do what I tell you how to do here, you do so at your own risk. This page is presented for informational purposes only and you bear full liability for any property damage, injury, or death that may occur because you messed up your rifle. I am an amateur gunsmith (for love of the art, not for profit) and whether you or I work on your rifle, any of the activities discussed below will almost certainly void the warranty on your Marlin. If you know someone who will undertake to do this work for you, the majority of it could be done if you sent only the complete action and trigger assemblies, without sending the FFL-required receiver or a whole weapon.
The work described below was done on Model 60 rifles, but your Marlin's action should be very similar. This trigger rework will also work with minor (if any) variation for Models 60C, 60SN, 60SB, 60SS, 99, 99DL, 99M1, Glenfield Models 99G, 60G, 60, 65, Models 60DL, and 60SSK, as well as Revelation model 120 or any of the other private label/rebadged rifles from Montgomery Ward, Coast to Coast Stores, Western Auto Stores and Cotter & Company. Marlin Model 795, 795SS, 70PSS, 7000 and Papoose rifle owners, this should work for you as well, according to several readers' comments.
For the curious: Yes, you might hire me to do the labor detailed below. It would cost something like half what a new Marlin 60 would cost at retail. Several readers have asked if I would work on their rifles and all have turned away at the price; let me turn you away also: You CAN do this work. Read this page through, try to memorize which part is what on the parts diagram, then read it again. See how there are a bunch of steps, but each step is simple and logical. Then get out a good screwdriver and take the stock off your Marlin. It is easy to take off the stock, and then you are half way there. Look at the pictures some more. The tools I use are (mostly) not specialized tools. In the very worst case, replacement parts are available for most modern guns if you mess it up . . . but you will be so confident and careful . . .
Go on, try just opening the stock and looking inside . . . :D
********
Once upon a time, I took my newly-acquired Marlin Model 60 out shooting and shot it until it was so dirty it started to malfunction. I noticed that the accuracy was pretty good, but I also noticed that the accuracy would be better if the trigger were better. Sure, you can train for trigger control, but you shouldn't have to fight a weapon that you have in your own personal arsenal just to keep it on target.
Stock, the trigger felt like a Glock's trigger: one long, creepy, stacky pull, with a slight but obvious hitch right before it let off. As with a Glock, you can learn to live with a trigger like the one my rifle had. But you're not here because you want a Glock trigger on a rifle you might need to give you dinner tonight.
After the work I am going to describe to you below, the trigger on my latest reworked rifle feels entirely different. It has two very distinct stages, and a crisp release; it gives no notice it is about to trip. It's no glass rod breaking at 2lbs, gunsmithed-by-angels 1911 trigger, but it is much nicer than it was before. It breaks at 3.6lbs. One reader reported that his trigger went from 9lbs to 4.5lbs after this work. If you want a cleaner, lighter, shorter trigger pull, keep reading.
Tools Required:
First: Check to be sure the weapon is unloaded.
Then check it again.
Please click both of those links and then come back. Go ahead, I'll wait.
For those of you cursed with good eyesight and who therefore do not walk around with shatter-resistant eyewear 24/7, now is the time to put on your safety goggles. Reader Cyde Ways pointed out that we're about to have springs under pressure potentially flying across the same space where you have your eyeballs. If there is nothing between your eye and the spring, you'll regret it. Glasses on.
Then disassemble the rifle. Remove the two screws holding the barreled receiver to the stock, and remove the action from the receiver. Remove the screw holding the trigger guard assembly to the stock and remove the trigger guard assembly. Set aside the barrel/receiver, stock, and breech bolt. You will only be dealing with the action and trigger.
Wait, what?
If you are lost, either stop and turn your weapon over to a competent gunsmith, or keep studying here and elsewhere online until you understand everything on this page.
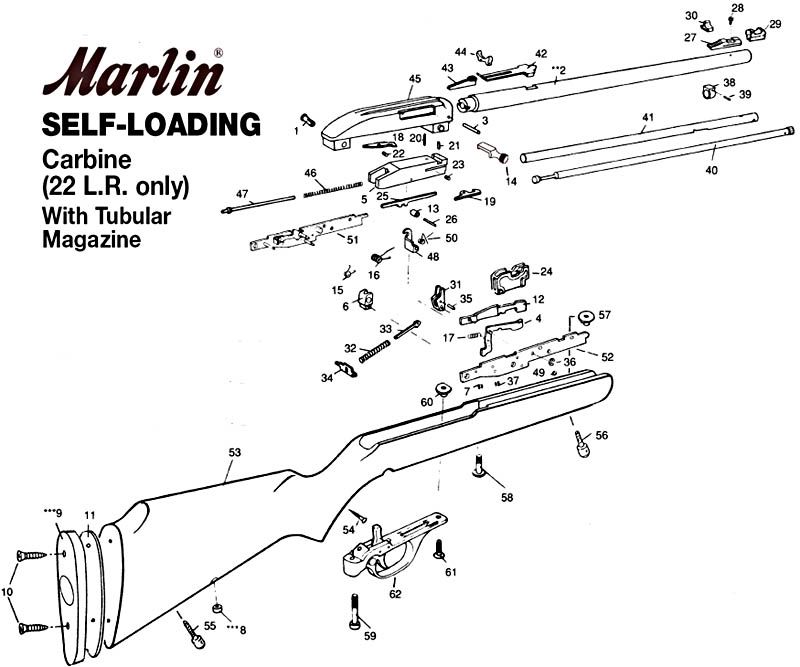
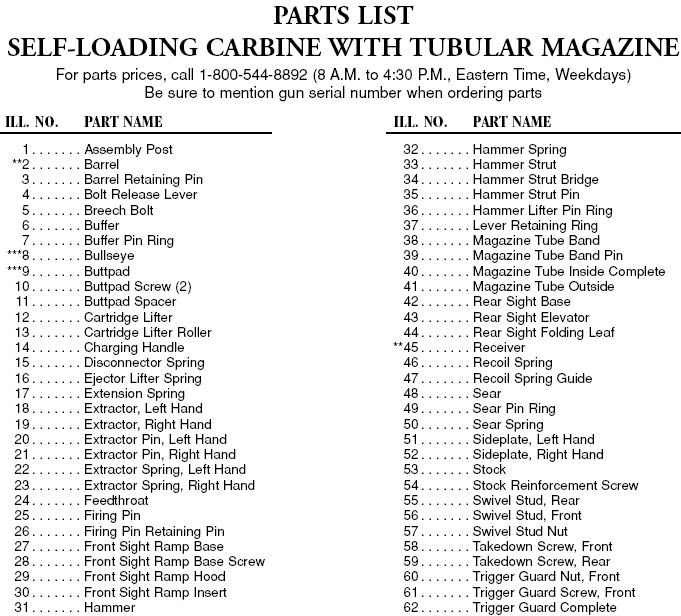
Right, let's all get on the same page. That page is in the back of your manual. The parts diagram and parts list page.
NOTE: Google reduces image quality on this page to speed up page loads. Click on any image to see it at full size and resolution.
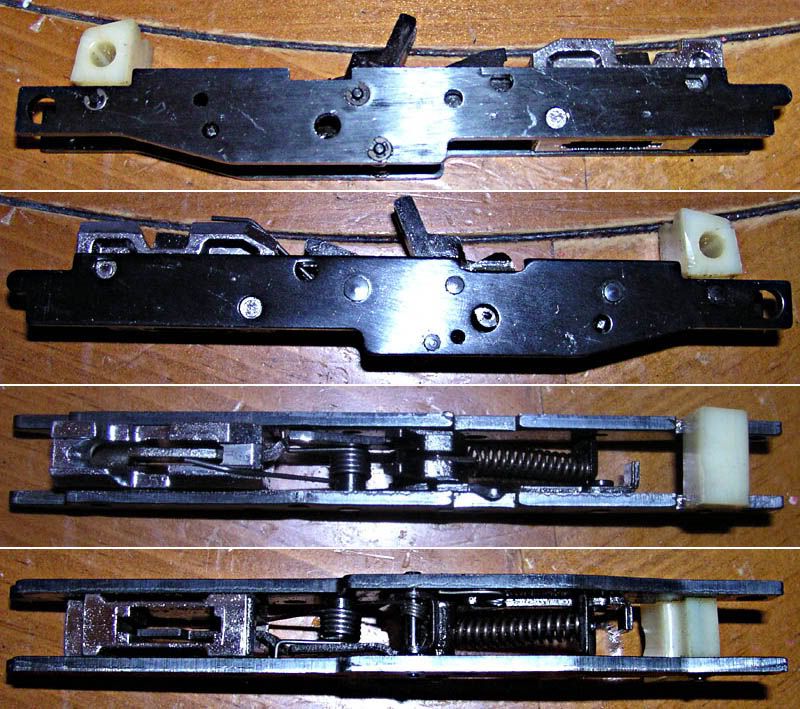
This is what the action looks like properly assembled.
Clean the action if it needs it. Seriously, this is somewhat delicate work, and you are going to have your fingers all over the place in there. You'll want it clean.
I am certain the people at Marlin don't do it this way, but I found out by accident how to remove the hammer spring very easily. Push the hammer down to cock the action, then push the disconnector forward to fire the action. The disconnector is part of the left hand sideplate, part 51, and it doesn't come off during this procedure. Push the little hook part to which the orange arrow points, to fire the action.
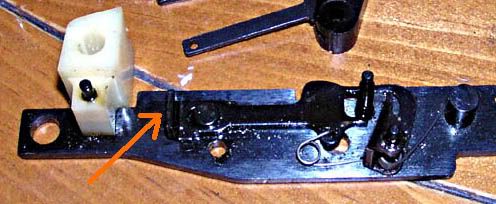
You may have to push surprisingly hard. If your rifle is like mine, the hammer spring will go flying across the room. The hammer strut bridge (circled in red) rotates enough to let the hammer strut slip out of (or into) the hole in the bridge.

If the hammer spring was not released, you will have to do it another way. Reader Jim emailed me and said he could not remove his hammer spring by letting it all fly to pieces when he fired the action, so a few more comments are in order on this point. I have taken down actions without removing the hammer spring before removing the sideplate as described above, and it is nothing to worry about. Reader Martin emailed and said, if you don't want the hammer spring to go flying, you can have it your way. If you want to make life easy on yourself when you reassemble the action, and you are not going in there to cut the hammer spring (this time, see below), you can ensure the hammer spring remains on the hammer strut, and the strut bridge will be correctly placed in the action. Before disassembling the action, cock the hammer. Note the hole in the end of the hammer strut:
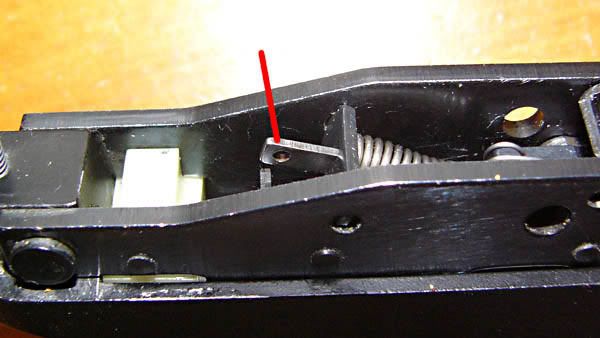
Cut a short piece of a heavy duty paper clip or some other stiff piece of wire, and insert it into the hammer strut's hole.
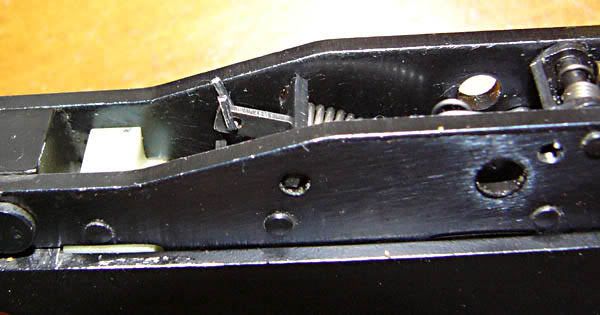
Loop the wire to form a ring, and fire the action. When you get the action taken down far enough, you can remove the hammer, its spring, strut, and bridge, all in one assembly. This is also possible to assemble after the hammer is out of the action with the spring and bridge loose, but I had to use an assistant's hand as well as both of my own, because it is a bit tricky. Possible, but tricky. This tiny bit of wire is a HUGE help when it comes time to reassemble the action, because there is no fooling with the hammer spring when everything is loose, about to be put together. It just drops right in.
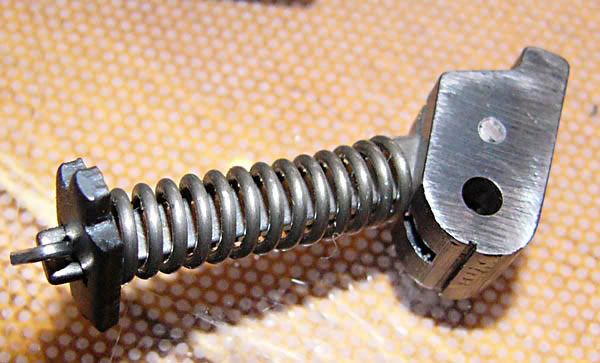
Skip the hammer spring retention paper clip for now if you want to have the action all in pieces. Fire the action to reduce the amount of potential energy inside, but if that does not free the hammer spring, you have several choices. Before I cover them, I will mention that your hammer strut may be too long, and these methods will not work if it is.
First, you could try pulling a little on the hammer in the "fire" direction of motion, to see if the strut slips out of the hammer strut bridge. Another thing to try, if it looks like you are aaaaallmost theeeere is rotating the hammer strut bridge a little to let a corner of the strut out of the hole in the bridge. Your sideplates may have been machined differently to mine, so rotating the bridge may not be possible. If it seems you cannot remove your hammer strut spring before removing the sideplate, it is no great worry. Just remove the sideplate anyway and remember there is one more spring-loaded part inside.
Whichever method you use, a rag or a hand placed over the action might be a good idea, on the off-chance that the action does attempt an auto-disassembly.
Speaking of springs, here is a closer look at all of them, before you send any more of the little things flying.
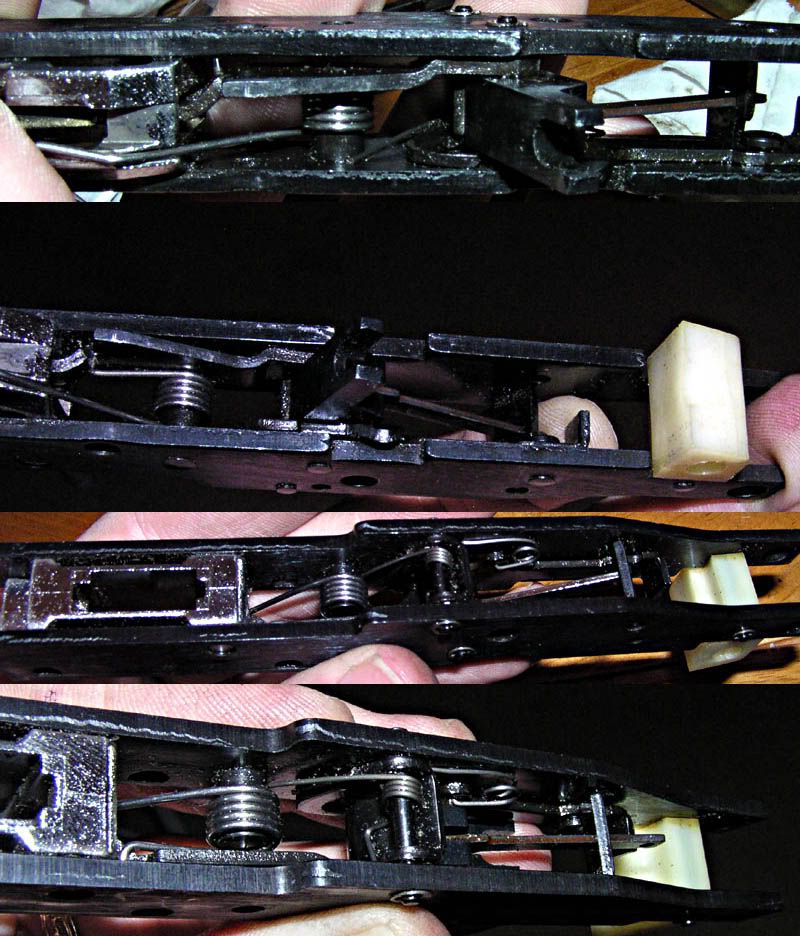
If your rifle has the automatic last shot bolt hold-open, you will have one more spring to deal with:
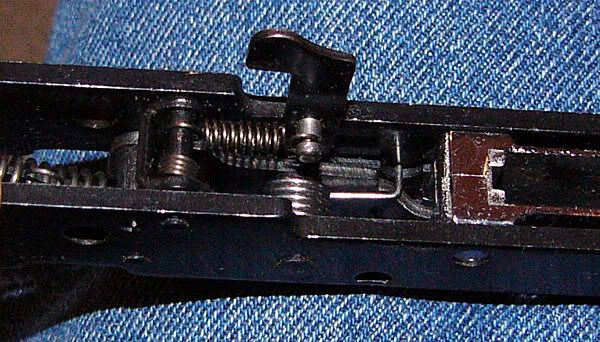
Remove the 3 small pin rings (E clips) holding the receiver side plates together by prying gently with the tip of your small screwdriver. There will be 4 clips if your rifle has a last-shot bolt hold-open feature; you need not remove that fourth (larger) E clip, unless you are going in for a deep cleaning. Don't pry the clips up away from the sideplate, pry away from the pin along the surface of the sideplate. Place the action clips-side up. Gently pry and pull until the plate comes off the works. I heard from Ron Atomic that these clips look an awful lot like the clips that hold radio controlled cars together. You might check your local RC hobby shop if you need a new pin ring.
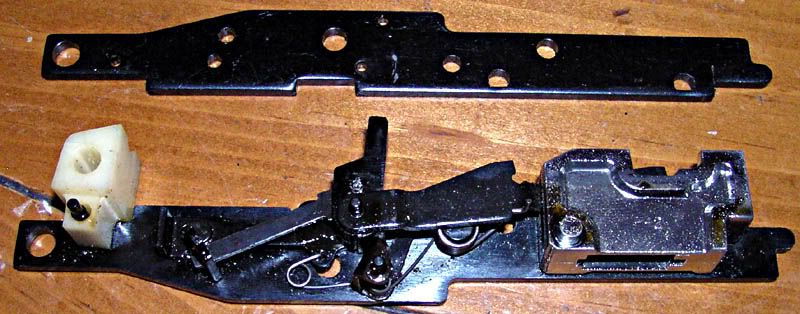
The feedthroat is held in largely by spring tension. Moving the spring off the top of the feedthroat caused the feedthroat, cartridge lifter, and ejector lifter spring, to fall out energetically into my hand which was waiting on top of the receiver in case this sort of thing should happen, like so:
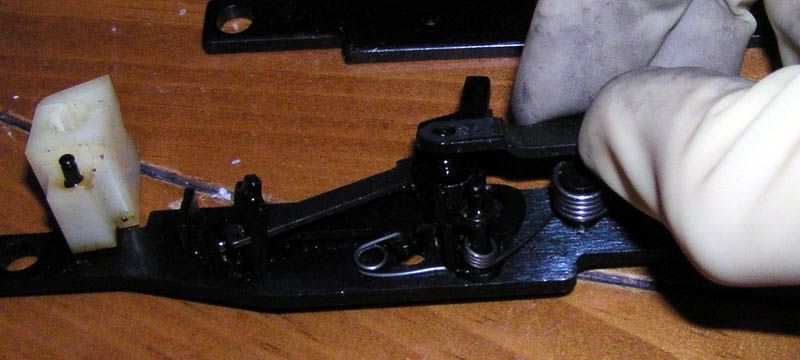
to prevent it flying apart. The feedthroat may be a snug fit in the sideplate, but go ahead and lift it, the cartridge lifter, and the spring, off the action. Pull the hammer and hammer strut bridge out of the action and set these parts aside for now. If the hammer spring was still installed, be careful not to let it, or the hammer strut bridge, go flying away.
The sear is held back with the sear spring. Note in the image below, how the bent leg of the sear spring lies against the sear as you take it apart. The end of the bent leg rests inside the sear when you put it back together. Unclip and pull the spring out, and pull out the sear.
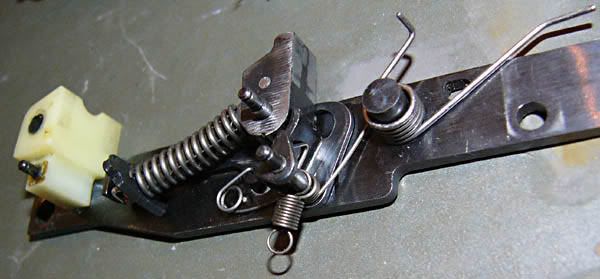
The disconnector spring is also coming out. Note that BOTH ends of this spring are hooked, so be a little gentle when you pull the ends out.

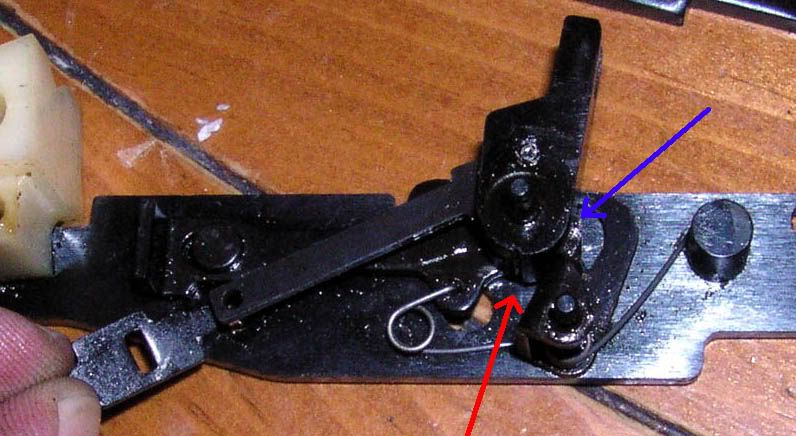
The tip of the sear (blue arrow) goes into the groove on the base of the hammer (red arrow) when the action is cocked. When it is fired, the sear rides on the larger-radius face of the hammer as shown. When the action cycles, the sear rides very briefly on the smaller radius face of the hammer (to the left of where the red arrow points). You want to smooth out the round bottom faces on the hammer and make the edges straight and flat on both sides of the groove where the sear goes. The point is to have smooth metal rubbing against smooth metal. You want to smooth it. You do not want to remove metal unless (as on some hammers) there is some funky machining on the part already. When this trigger rework is done, you will have a freshly-shaped sear edge riding on these surfaces. Don't leave them rough so the sear will get all ground out of shape again!
Do I really have to say it? I will anyway: rub with your sandpaper in the same direction the parts rub against each other in the gun. Ready? Let's go.
The tabletop made a flat-enough flat surface, and I put the sandpaper on it and rubbed the larger radius of the bottom of the hammer smooth. Then I wrapped my sandpaper around the charging handle (any flat, rigid, small thing will serve) for a sanding block and smoothed the smaller radius face as well.
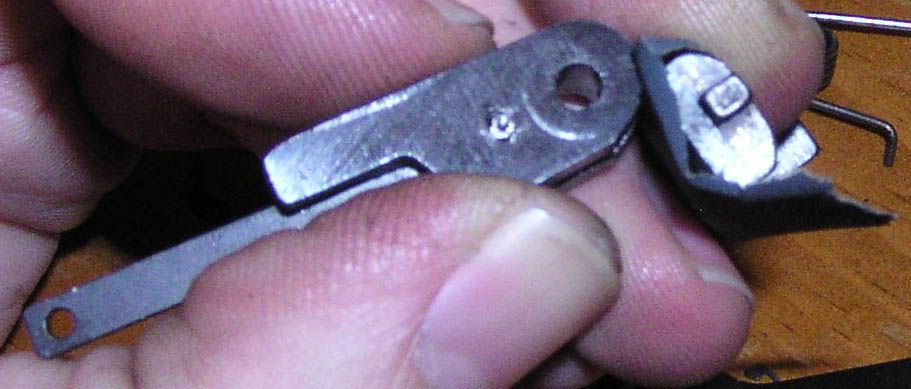
You want these faces to remain flat. Using a very fine grit sandpaper helps smooth it all out without risk of changing the geometry.
Bend and crease your sandpaper and rub inside the little groove where the sear sets, to make the inside faces flat. The edges on the corner of the groove should be straight and square and slightly sharp, but not razor-sharp. If the edges are too sharp, they will break under the stress of normal operation. When you are done, go back and give them a quick, gentle swipe with the sandpaper just to "break" the edge.
This action has a worn spot between the disconnector and the sideplate.
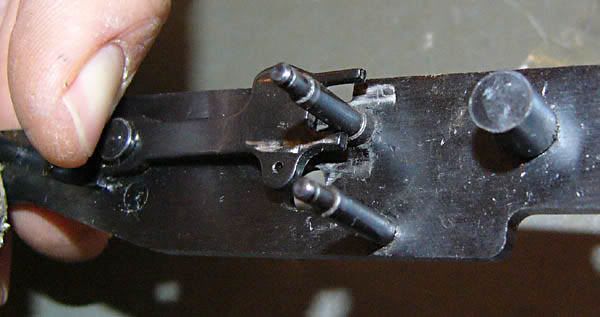
This is an obvious source of friction, whether your action is this badly worn or not. I used the disconnector as a sanding block and sanded the inside of the receiver rail, then flipped the sandpaper over and held the sandpaper to the rail, sliding the disconnector to smooth the hidden face of it. Sand it down until it feels like the disconnector is sliding smoothly on the sideplate.
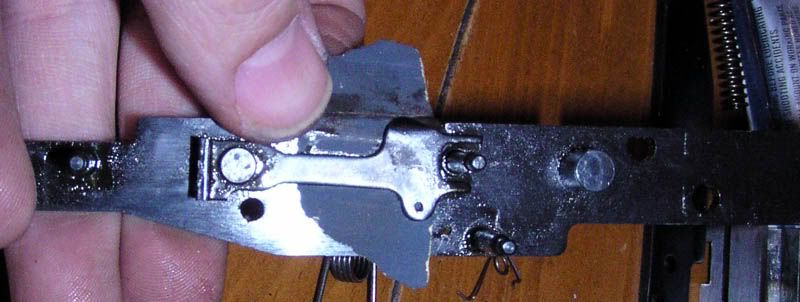
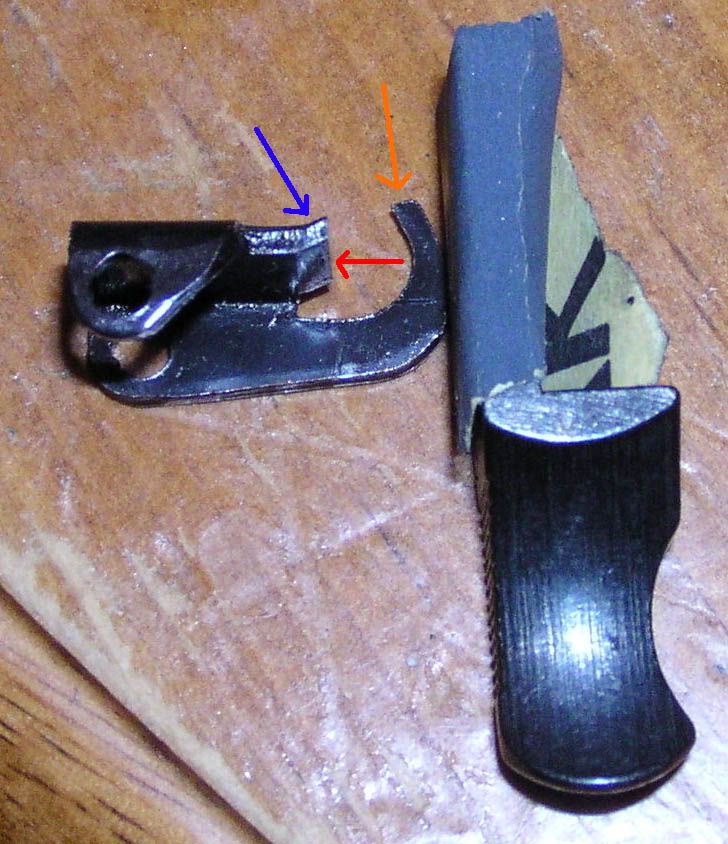
Orange arrow: I squared off this face a very little but mostly smoothed it out. This is where the disconnector acts on the sear. Changing the geometry of this part may result in your weapon not being able to fire, so be careful.
Red arrow: This is one of the very most important parts to get right. This face of the sear rubs the hammer. When the corner slips out of the groove in the hammer, the hammer falls. You want this face to be smooth as a baby's bottom, and the edge to be as close to dead square as you can get it. If the edge is farther into the hammer on one side or in the middle, your trigger release is going to be sub-optimal (creepy). The whole face of the corner slipping away from the whole face of the corner in the hammer in the same instant is what you want. Again, you are smoothing the face of the metal, not removing metal. If the finish is gone all the way across this face of the sear, you may have gone farther than you needed to. PLEASE NOTE: if you change the angle of this face, you will either increase trigger pull weight or, going the other way, render the rifle less-safe, possibly up to the point where it can have accidental discharges*. Keep the geometry the way it was!
Blue arrow: This one is a little tricky to get with the charging handle/sanding block. You want to smooth it a little and so make the red arrow/blue arrow corner sharper and straighter. Don't go nuts on this part, it is really only touched up to get the corner into shape. When you're done with this face, very lightly "break" the sharp edge you just made, as you did on the hammer.
There may be some very minor burrs on the edges of the holes in the sear. Deburr the edges with a knife. Then hit the holes with some sandpaper like so:
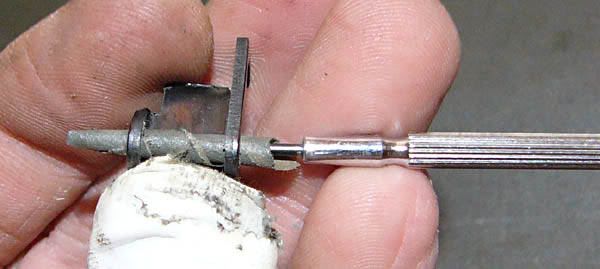
Making the holes bigger will lead to slop. Just smooth it.
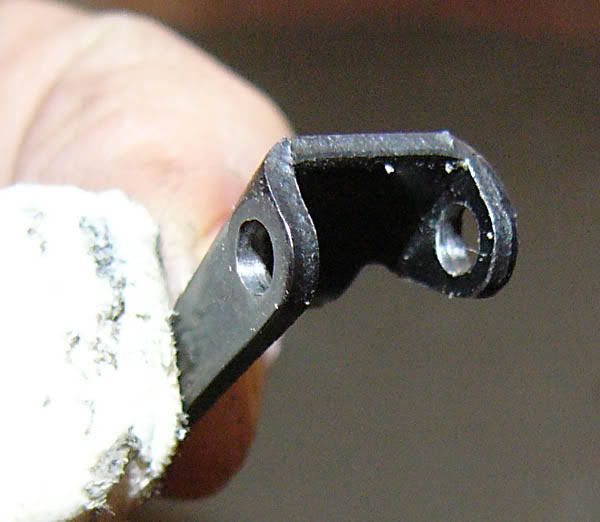
Put the hammer and sear on their pins on the sideplate. Rotate them. Do they have any grit or resistance to rotation? Then wrap your sandpaper around the hammer and sear pivot pins and lightly smooth them out as well. The idea is to have them rotating smoothly. Only do this if they don't, and then only do this until they do.
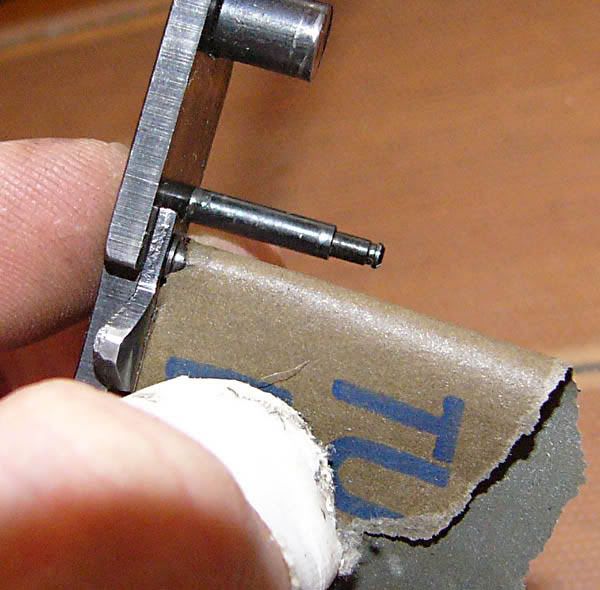
*Be careful not to go too far. Removing too much material at this point will make your rifle a display piece. If your hammer has zero engagement with the sear, it will never stay cocked. That means either the action will never fire, or it will fire 100% of the time as soon as the bolt closes. I am NOT sure if the action will fire hard enough to discharge a round from the rifle as the bolt closes; I only mention it because if it did then this is a dangerous condition! I don't know about you, but sometimes I charge my rifle with a slightly lighter grip than I use when firing. Just imagine what would happen to you if it fired the entire magazine when you were holding it with that loose grip. Or your child. This is NOT the way to convert a Marlin to automatic operation. As far as I know, there is NO WAY to convert a Marlin .22 into a machine gun. The other possibility is that, because the hammer is riding the bolt as the bolt flies forward, the firing pin may strike the rim of the next cartridge before the bolt is fully in battery. Do you really want to find out if it would have an out of battery explosion, with only the side of the cartridge casing trying to hold in 25,000PSI with a couple thousandths of an inch of brass? Really? I don't. All removing too much material from the sear/hammer interface could do is prevent firing or else remove your control over when the rifle fires. This is not select-fire, this is DANGEROUS. Do not remove too much material from the hammer/sear engagement surfaces. You have been warned. Back to work!
Use your finger as a sanding block and smooth out the spot on the top of the trigger where the disconnector rubs. Just make it smooth. The top of the trigger (at the top of the image) rubs on the rear face of the disconnector.
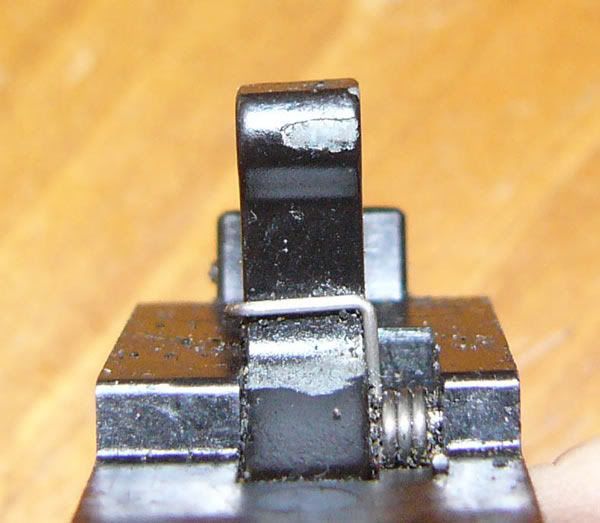
The corresponding wear on the disconnector is also plainly visible:
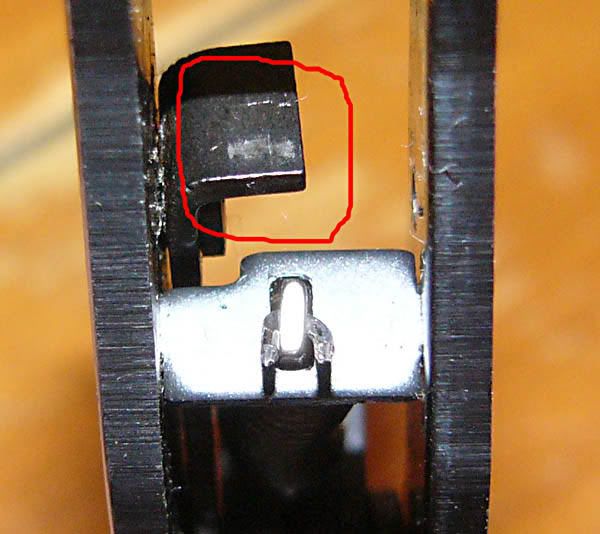
Gently smooth that also.

I read several reports of good success using the cover spring screw from a regular 3.5" floppy disc in place of the trigger reset spring so I decided to go for it. I pulled the trigger guard assembly out and measured the pull weight of just the trigger reset spring. It was 1.1lbs. That's one pound of pull, JUST to move the trigger! There oughtta be a law! Well maybe not, but at least we can fix THAT without much trouble. There are two screws that hold the trigger guard in the bottom of the stock. Remove them and the trigger guard assembly pops out as a unit. For those of you who will forget to note which screw came from which hole, here they are all lined up:
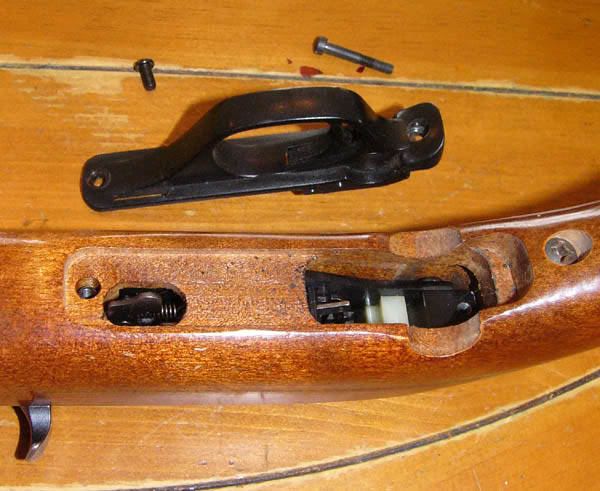
And here is the whole shebang, before disassembly:
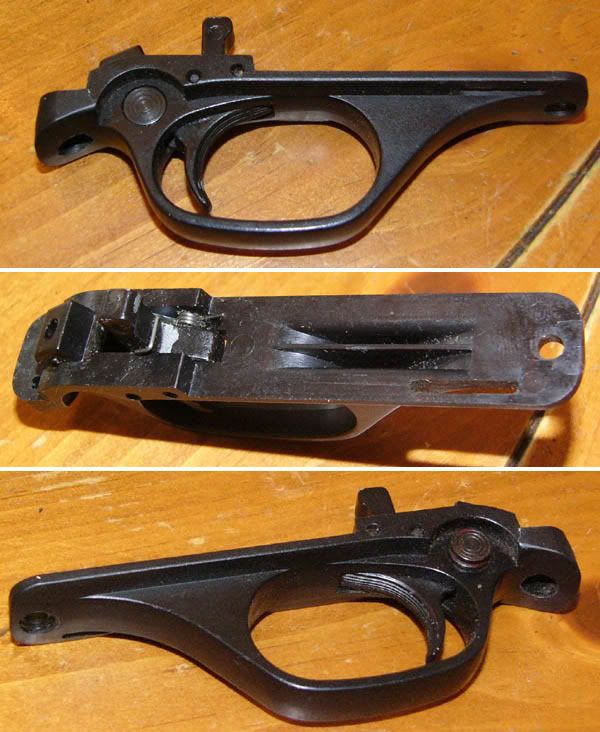
Note that the trigger pivot pin is swaged on one end, and should NOT be driven through the wrong way. Drive the pin out to the left, as shown
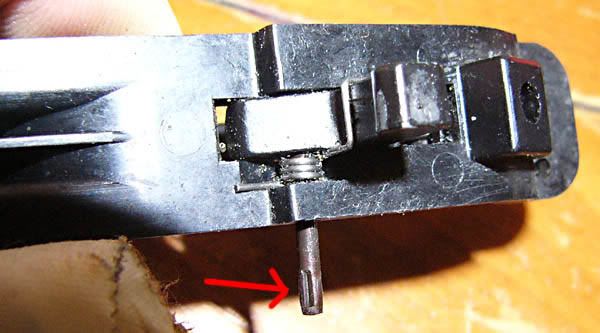
The parts of my rifle which I can reach are clean. I am a member of the Cult of Shootaguncleanagun. Look what came out with the trigger reset spring:
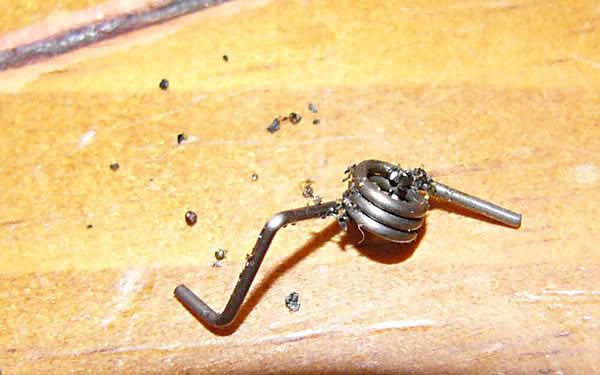
Clean the trigger out with q-tips until it rotates smoothly.
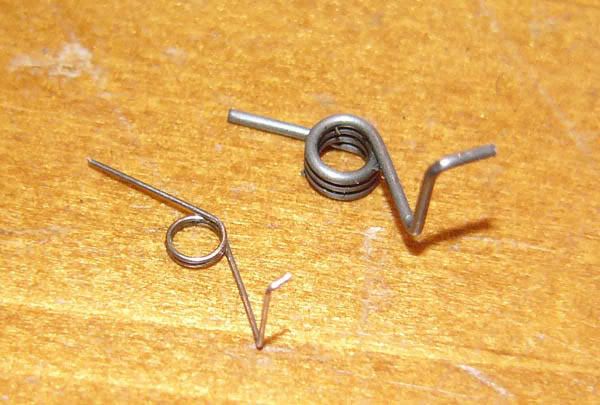
Try compressing the stock trigger spring by hand. It digs into your fingers. That spring is strong. The spring on the left is the one I made from a cut-and-bent floppy disc cover spring. It bends very easily by hand.
I read that one person gave up on this spring replacement because his trigger wouldn't reset with the new spring installed. Mine wouldn't either. The spring jammed into the gap between the trigger and the guard. I noted that the spring seemed to "want" to sit wherever it was placed, either by the trigger or away from it. The problem is, there's nothing to hold the end of the new spring away from the trigger.
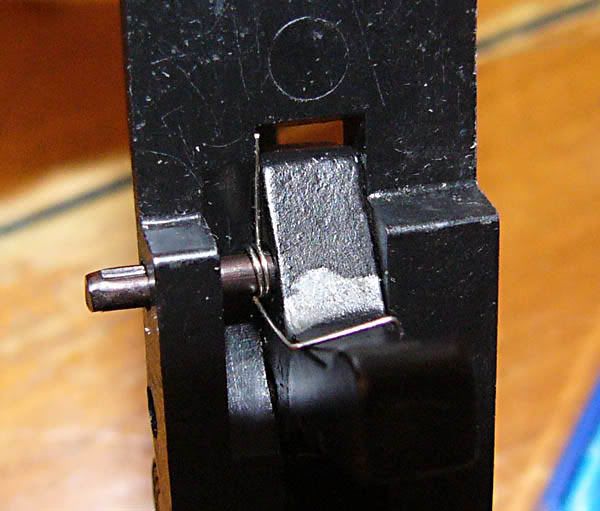
Okay, I said, lets move that spring away from the trigger. A bushing was made from another short piece of a heavy-duty paper clip. It moved the spring away from the trigger, but the spring would still get lodged between trigger and housing. I used a pocket knife to cut a tiny notch into the trigger guard.
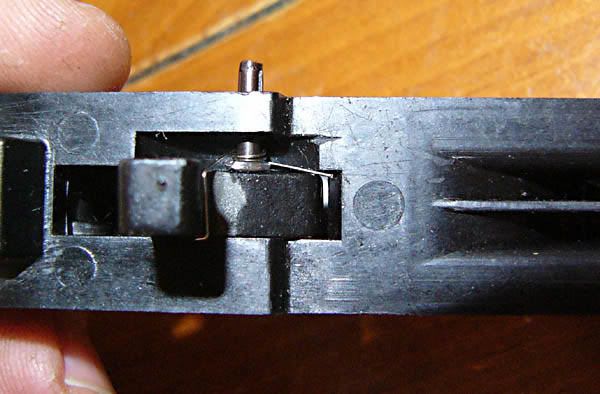
The spring fairly leapt into its new seat, and stayed there like a champ. Done. I broke out the force guage again, and the same trigger that was over 1# to move, now did not register on the gauge at all.
One of my Marlins had a hammer spring that was unreasonably difficult to reassemble into the action. This would also tend to cause un-necessarily hard firing pin strikes AND a heavier trigger pull. I cut the spring down. That is, I cut ONE (only) whole coil off the end with heavy-duty cutting pliers. This is the end of the spring, stock:
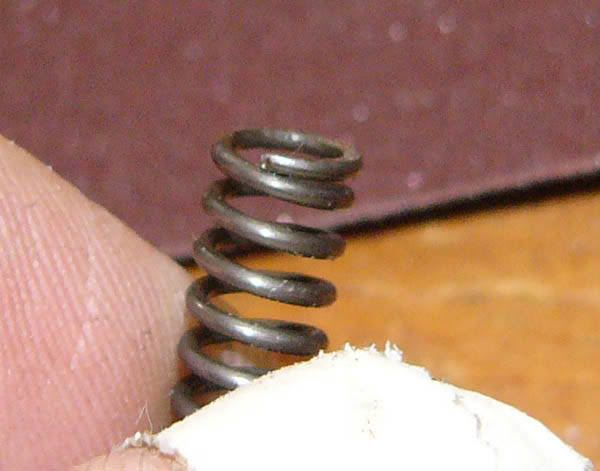
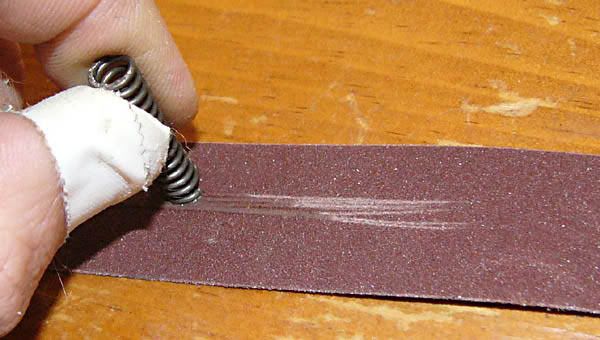
I used 220 grit sandpaper and rubbed down the cut-off end of the spring, so that it would have a better chance of sitting flat on the hammer strut bridge without damaging anything:
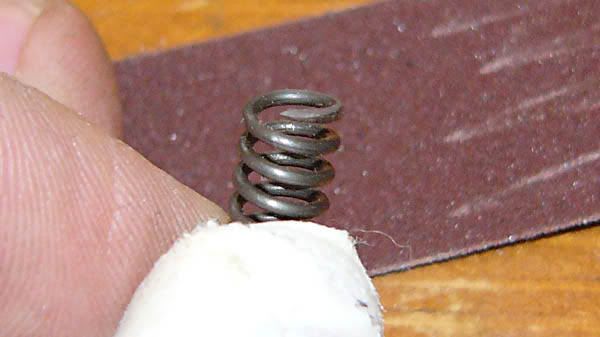
It ended up looking like this:
Reader Martin emailed and said he also had good success cutting his hammer spring. I have seen reports of light strikes (failure-to-fire) when other people cut 1.5, 2, or more coils from their hammer springs.
You're done. Put it back together and enjoy. Assembly is the reverse of disassembly. Before you put the sideplate back on, you want your springs to look like this:

After it looks like that, all you have to put in are the lifter and feedthroat. You do NOT have to springload the feedthroat yet. N.B.: the bolt hold-open spring goes on the pin inside the ears of the sear, with the sear spring, not outside the sear!
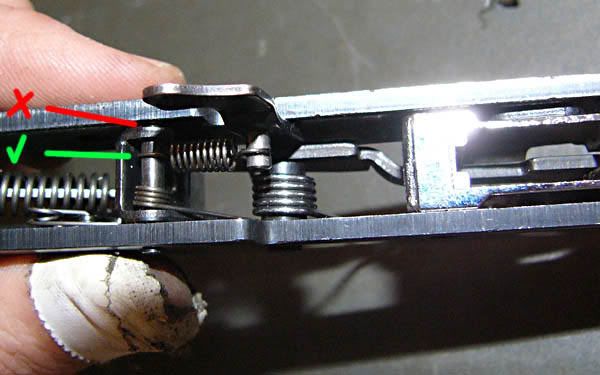
When all the sideplate retaining clips are in, THEN spring load the feedthroat. The top end may fall into its groove on the feedthroat by itself, but it is easy enough to place. Use a flat screwdriver to push the spring down into the action
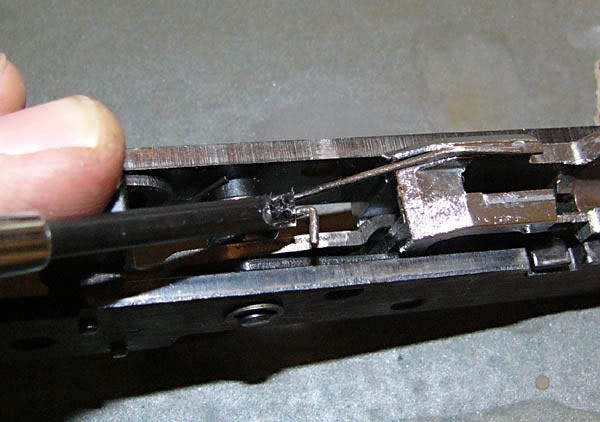
There is a little cut-out in the lifter that looks like the spring gets hooked into it. That's not where the spring goes.
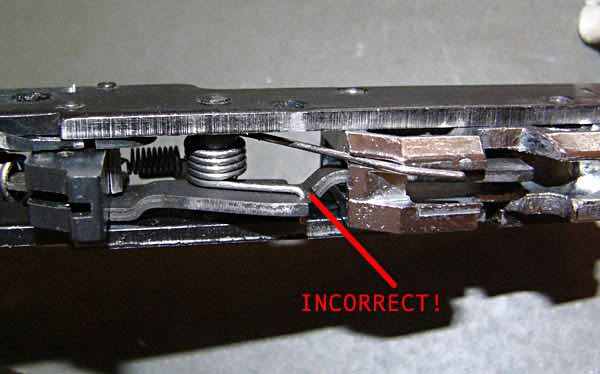
Keep pushing. The spring goes all the way through the action and hooks on the bottom of the lifter. It also hooks onto the bolt hold-open lever.
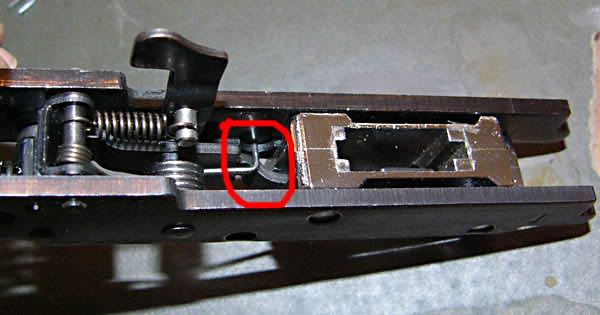
If your bolt hold-open won't hold the bolt, it is likely you didn't push the spring all the way down to its the proper location on the bottom of the lifter. The lifter spring may be a minor hassle to install the first time you do it; this is normal.
In case you were wondering, yes, you can spring-load the bottom of the lifter first, and then put the top on the feedthroat. I find that to be the hard way. If you put the lifter spring in upside-down the action will not seat properly into the rifle when you go to put it all back together. If you try to screw the action in, you may damage the spring.
For the disconnector spring, put the disconnector end in before the sideplate end. The sear spring, as mentioned previously, has to sit just-so against the flat front side of the sear to hold itself in there. Put the sideplate back on, and push the clips back on their posts. If you removed the buffer, be sure it goes back in (!) before installing the sideplate. lightly oil all the parts that rotate, and very lightly grease (with a good gun grease) the parts that slide against each other. Reassemble the rifle.
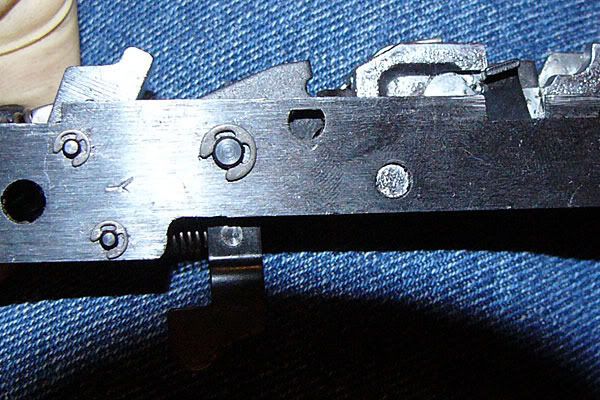
For those worried that the bolt hold-open might have been reassembled improperly, you shouldn't lose any sleep over it. That mechanism is fairly straightforward if you have already come this far, but if it makes you feel any better, this is what it should look like from the outside when properly assembled:
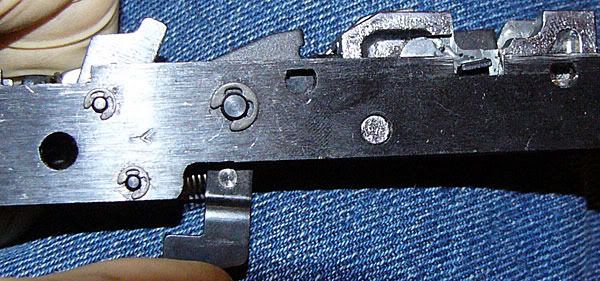
And pushing on the lever (as to release the bolt) only makes it do this: (hint: the bolt hold-open catch by the feedthroat is down in a groove on top of the sideplate in the following photo)
One reader caused me some mild distress at this point. He did as I instruct on this page, and his action would not fire! It turns out he had reinstalled the hammer strut bridge the wrong way round. If it is inserted incorrectly, the action will not be able to fire. IF your action will not fire, have a quick look at the hammer strut bridge. It may have a circle rubbed onto it by the hammer spring. It definitely will have a cut out for the disconnector. It (properly) only goes in one way. Thanks [redacted to prevent potential embarrassment] for your feedback!
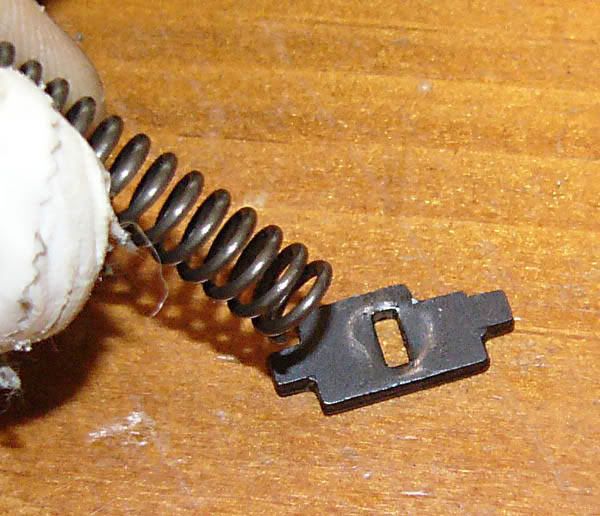
Now you need to test the trigger. Pull the bolt back and let it fly forward (or release it with the hold-open release). Pull the trigger, slowly and gently. That's nice, right? Don't do it much, you'll ruin the face of the chamber and/or the firing pin with dry firing. Find a spent casing to put in the chamber if you want to go showing everyone.
What's that?
You wanted it lighter still? Okay, reduce spring tension further. I have seen one sideplate with a small hole drilled in it just below the lifter spring post. The end of the sear spring was inserted into the hole. This would reduce the amount of tension holding the sear into the hammer. While this is likely perfectly safe with positive hammer/sear engagement, it gives me the willies thinking about a sear that might be so loose it gets knocked out of the hammer by a sharp impact to the assembled rifle. You might also be able to relieve some of the disconnector spring's tension. Unless you are going for a match rifle, you may want to leave the sear and disconnector springs alone (see notes on safety, below).
That's about all you can do to your Marlin's trigger to improve the crispness of release and lightness of pull. If you want a shorter first-stage pull (takeup), you can have that too. If you want to have a one-stage (no take-up, just a crisp let-off) trigger, that may also be possible. It may also be ill-advised (see notes on safety, below).
You can also install a set screw at the rear of the trigger guard to prevent trigger over-travel. If I get to it, I'll append this page with instructions on how to do this modification as inexpensively as I can figure out how to do it (not everyone has a tap & die set).
Use a high-strength, high-temperature epoxy (some people have used J-B Weld) and put a daub on the trigger where it contacts the disconnector (or the disconnector where it hits the trigger) and sand it down. Take off a gnat's whisker thickness at a time from the blob of epoxy with fine sandpaper, then reassemble the rifle and check for function. Be sure the receiver is seated all the way back in the stock (the relative geometry changes depending on how far back the action sits in the stock). Remove epoxy just until the action will reliably reset. If the epoxy is too thick, your rifle may not function properly. Another method I have seen is to install a very small set-screw into the top of the trigger where it rubs the disconnector. This would involve drilling and tapping the trigger, and you would want to polish the rubbing end of the set screw and use some loc-tite on the threads, but it seems like a good idea for those who like to tinker. The best image of a trigger set-screw I have seen to-date was made by, and is here used with the permission of, HotRod9mm at RimfireCentral.com:
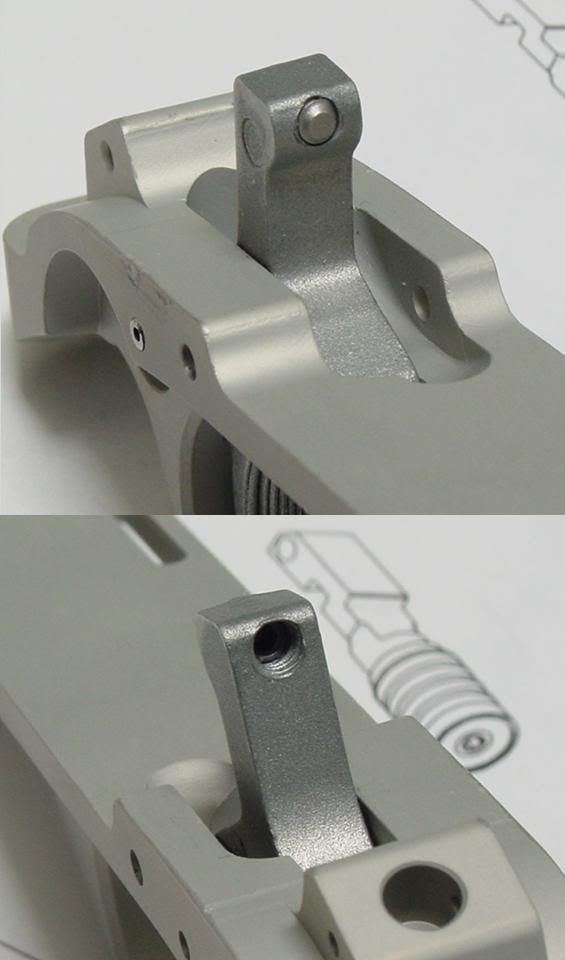
He says to make sure it is offset to the left, so that it will touch the disconnector.
There are two pins in the trigger guard assembly. One of them has a relatively humongous hole in the trigger. This is possibly due to the constraints of mass-production techniques. You are not mass-producing. Several people at rimfirecentral.com have reported good success when they installed a short length of .014" or .016" thickness brass or bronze tubing around the inside of the hole in the trigger. This is reported to take up some of the first stage travel and prevent over-travel. It is also reported to interfere with proper function of the safety, so some filing may be required to have a functioning safety (please do the filing, see notes on safety, below).
I am eager to do the pin bushing modification. I am not ready yet to build up the face of any of my triggers.
A brief note about the safety catch on the Marlin 60 action: It is pretty chumpy.
Check this out:
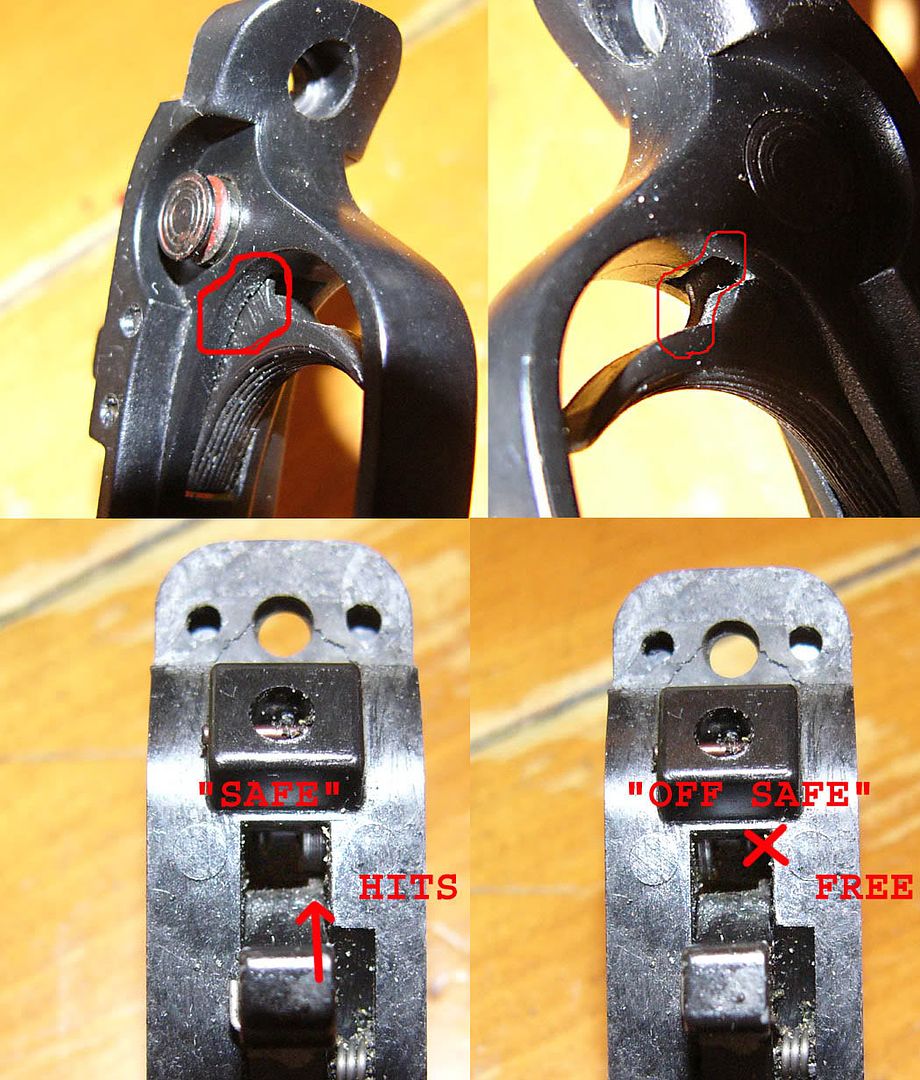
There is a little tab on the back of the trigger. That tab bumps into the safety pin you push through the trigger guard to set and release the safety. The safety is basically a doorstop for the trigger (similar to the SKS' safety lever). Anything you do inside the action to make it tend to fire more easily, will NOT be made less effectual by the safety. You should try to make your internal modifications either safety-neutral or "intrinsically safe" - they should have the effect of making the action move away from firing.
Now a longish note about the action in general, heavily laden with my own personal opinion.
The Marlin 60 action/trigger is a two-stage design. The first stage is actually two stages itself, in stock form. Properly (safe and reliable being part of 'properly') set up, it will still be a two-stage trigger when we are done in there. The first part of the first stage of the stock trigger pull is taking up the slack in the trigger itself. This is a short distance of light resistance pushing against only the trigger reset spring. You may not even notice it. The trigger will eventually touch the back of the disconnector. The main part of the first stage of the trigger pull is the trigger pushing the disconnector forward until it touches the sear. The disconnector is spring-loaded to about 1-2lbs.
I am a fan of two-stage triggers, but you may not be. This action CAN NOT BE safely modified in isolation (without the receiver and stock to which it will be mated) to the point that the first stage of trigger travel is eliminated. There is too much slack in the stock where the action mounts. It is possible to rework your trigger so that, when the action is set slightly (thousandths of an inch) forward in the stock, it is safe. The same action, moved back just a hair, would be completely unreliable and a hazard even to load. It is NOT a "set trigger" type of action. It is a two-stage trigger. You can set up the trigger with a very short and light pull, but in order to be reliable the trigger must have some first stage to it. Look at this gap (between the sear and the disconnector, action out of the rifle):
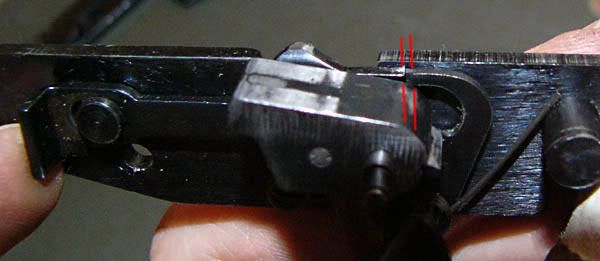
That is a small gap, maybe 2mm. When the first stage of the trigger is comletely taken-up, you have pushed the disconnector forward to this point:
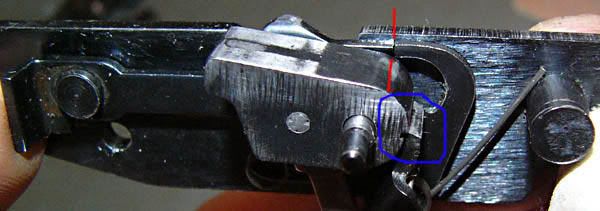
The second stage of the trigger is the (very very short) amount of travel required to push the sear out of the hammer, firing the action. If you should decide to install a set screw or add epoxy to the front of the trigger where it pushes the disconnector, you absolutely MUST take this gap into account! When you are adjusting the set screw or shaving the epoxy, please, please, for the love of everyone on the range including yourself, check this with the assembled action in the stock with the trigger guard/trigger assembly installed in the stock also. If there is any play to the trigger guard's mounting area, set your trigger as far forward in the stock as possible before tightening it down for this procedure. Then fit the action into the stock, without the barrelled receiver, and slide it as far forward as it wil go. Note that the nose of the trigger is completely OFF the back of the disconnector. This is the longest-travel scenario for your trigger pull (unless the trigger guard assembly is mounted farther back but that would be against the point of this exercise). Now slide the action straight back in the stock. Notice as you slide it, that the trigger first touches, then pushes on the disconnector. It may push the disconnector through as much as HALF of its travel. If you add more thickness to the front of your trigger, than is taken up when you slide the action back in the stock, you may end up with an action that will not (or not reliably) reset, or you may end up with an action that will discharge with the slightest touch of the trigger or even a light impact to the rifle itself.
Isn't that the idea, VFD? I thought the point of this exercise was a light trigger!
If you use your Marlin only as a match gun, this might be just the ticket. You, dear reader, are of course 100% responsible and would never violate any of the Four Rules. You, I trust absolutely (which is why I wrote this page instead of only running an advertisement to do Marlin trigger jobs in the first place). But here's the thing. If you think you may ever hand it to anyone else, you are putting your neck on the line. What happens when someone used to a 6lbs two-stage trigger puts her finger in the trigger guard with your 3oz. trigger? Bang, is what. This is not a safe condition for most people's rifles. This is also not so great for hunting. If the rifle will fire when you are jostling through the trees or trying to get into a firing position, you've missed and frighted your game. In my opinion, you NEED to have a bit of first stage travel in this type of action.
When the action is as far back in the stock as it will go, and the trigger as far forward as it will go, you want your work to leave at least several (read: 10+) thousandths of an inch between the disconnector and the sear when the safety is set and the trigger pulled back, HARD. That is to say, set the safety and pull hard on the trigger, and see how close the disconnector comes to the sear. If it has a little gap, you're golden. If there is no gap, you may effectively have a single-stage trigger on a rifle with no safety. If that's what you are going for, go for it, but I recommend against it for safety's sake. There may also be so much preload on the disconnector that the action will not reset, which is not so great for having a working rifle.
The second stage of trigger travel is very short, and when you are done working on your hammer and sear it will be shorter still. Because of the potential hazard, I recommend doing the rest of the trigger job, installing a trigger pivot bushing FIRST, then finally doing any trigger nose buildup you think you need to do. You are responsible for the safety of your own weapons.
I'm ready to go for it! I loves me some set trigger action!
Consider this then: It is just possible that you will not put your rifle together the same way every time. There is too much slop in the receiver-to-stock fit. It is possible you could give yourself a very light single-stage trigger when the rifle is properly assembled, but when it is off by 0.002" you could have a rifle that will not reset. The problem with this kind of not-resetting is that the hammer will be falling as fast as the bolt flies forward after ejecting a spent shell. Firing out of battery may be possible, and could be harmful or fatal to you or an innocent bystander. This is bad, mmkay?
Good luck!
If you liked this article, you may also enjoy my SKS trigger job DIY
If you have any questions or comments, please contact me using the email address at the bottom of this page.


16 comments:
David - this is an excellent write up. the pictures make it so much easier to understand.
what tool is used for clipping the spring? (like you did on the SKS)
thanks!
You're welcome, and I'm glad you find it useful. You're not alone; this pretty quickly became my second most-popular post (after the SKS trigger job) and most of the views originate from search engines.
If I recall correctly, I used a pair of heavy duty cutting pliers on the SKS's hammer spring. You could use a pair of hoof trimmers (probably easier) or a hacksaw (just be careful not to nick the other coils). Basically, anything that will cut a 1/16" piece of spring steel will work.
Then sand the end of the spring flat so it will seat properly. The sanding may take some time due to the toughness of the steel.
Did this on my marlin 795...
Had the rifle in a million bits. Put it all back together, round in the chamber *Click* nothing...
What are the chances that it was a duff round?!?! Works a dream and the horrible trigger is now much lighter and better than it was.
Top write up and very very helpful.
If it was new, chances are slim but stranger things have happened. Check the rim of the cartridge and see if it has the mark typically left by a good, solid strike.
If the hammer is falling (by now you should be able to tell if it is or not) and the striker making a good solid hit, it should go bang.
As an aside, you might want to just try again with another cartridge from a different lot.
I also have a Marlin 795; needless to say, your write-up DID work on my rifle quite nicely.
The disassembly was a bit confusing at first, as I had never taken the action apart completely. Aside from a few differences (the bolt release lever and the magazine sear disconnect) it was no problem to put back together after studying the diagrams and your pictures, along with staring blankly at the miniature pile of parts for a bit.
=P
My trigger was okay from the factory but is much smoother and crisply now.
Thanks a lot for the great guide!
I had to replace a buffer. The simple instructions said to remove the buffer pin.
That didn't work.
The next simplest instructions said remove all three pin clips and take the side plate off. Stuff disappeared, and I didn't even know what until I found your pictures.
The hammer spring flew across the room and the bridge hid under the stove, but now I knew what I was looking for.
I followed your pictures, got it all back together, and it actually fired. What a blessing!
Thanks,
Tony
Crowell, I'm very glad I could help. You and those like you are the reasons I go to the trouble. Thanks for speaking up.
Thanks a mill. Brother in Law doesn't clean his arms(slowly but surely bringing him around) His would fire one round, cycle, then you would have to recycle the action(dropping live round) to re-engage action. took it apart(had to drift away from the do not take apart instructions everywhere else. it had so much crud in it(think swamp mud) And along with the other post ahead, I had a pile of parts(And I was REAL careful as I took it apart) that was kind of daunting.
Found the problem---drift pin in the hammer was pushed out, making enough play for the sear to "swing" in and not engage.
Thanks for posting.
Great write up, I will probably attempt it either way... But my question is- Will this work (or might it work) to fix an actual problem I have. My 60 will fire fine for the most part, but every 20 shots or so, the trigger will not "catch". So you shoot, release, attempt to shoot again... no clicky/no bangy. It seems if you release the trigger again, it usually fires fine the next try. Any thoughts or ideas would be appreciated! Thanks, Don.
Don, that could be a problem in the relative geometry of the parts inside the action. It is possible a trigger job could fix it, yes, but I wouldn't try to find that out the hard way. I recommend you get it fixed first, so that you are not trying to troubleshoot through multiple changes.
I strongly recommend you visit Rimfire Central and ask the experts there to assist you in troubleshooting. They have a Marlin 60-specific subforum with helpful members with a deep reservoir of 60-related problem solving.
Thanks for the good info. I'm glad that you emphasized gun safety and making sure to check that all firearms are unloaded before doing anything with them. However, there's one safety step that I think you missed. It refers to this part of your post: "You may have to push surprisingly hard. If your rifle is like mine, the hammer spring will go flying across the room."
Whenever you're assembling/disassembling a rifle that has springs under tension in it, there's the risk of them coming flying out at extremely high speeds, as you said. Unfortunately, small objects traveling at high speed are pretty much the perfect recipe for blinding you if they hit you in the eye (and you won't have enough reaction time to do anything about it). Thus it's always a good idea to put on the same pair of shooting glasses you wear at the range when doing any sort of work like this.
GREAT BLOG!!! I've used a few of the techniques listed here. I used a grinder to take one of the rings off of the hammer spring. I used the spring from a ball point pen to make a new trigger spring. Trigger is much better pull already. Will work on the sear next. Thanks for all the great pics and details.
i liked that ur post very well it's been a long time since i took 1 apart, and ur site was the only 1 i could find keep it up, i have many other guns and clean other peoples from time 2 time.
Excellent David - Thank You
Your photos triggered a different thought regarding my 'Jamming 60.'
Questions: 1 - Ejector Lifting Spring and 2 - Left Extractor
1 - Ejector Lifting Spring
A) Should the 'Ejector Lifting Spring' be aligned (rest on top of?) the 'Feed Throat' or should it be bent slightly inward?
B) If it should be bent inward, how much should I bent it?
2 - Could my left extractor be worn?
a) My left extractor looks 'rounded and worn' as opposed to the right extractor which looks more 'pointed' where it contacts (grabs) the rim of the shell.
b) My left extractor has less 'clearance' than the right extractor where they contact and grab the shell.
My Marlin 60 jams EVERY shell regardless of ammunition style or brand (bought my 60 second hand for $45 from a seller who could not fix the jamming and was tired of the headaches - yes, I have cleaned, oiled, changed ammo).
As sgt. Schultz said, "I know NOTHING!"
Any advice would be helpful - thank you.
Regarding the Ejector Lifter Spring, I can only say that it should be shaped as shown in the photos, and both ends should be positioned as shown when installed. Don't feel silly clicking the photos to show them full size and holding up your parts next to the screen. It is possible if the rifle has a zillion rounds through it that the spring could have lost its springiness, but I would be likely to suspect other things first.
Even when we are talking about soft metalt, eventually moving parts wear on the contact points. If you have eliminated other possible causes, it could be that your geometry is too far-gone to be functional. I can't imagine used parts would be that expensive from some a sale on Gunbroker or at Numrich or similar sites.
Absolute worst-case, the action is not the problem and your receiver has some problem.
The easiest way I can think of to find out exactly what is wrong in your case is to find a rifle of similar vintage and start swapping parts. Second-easiest is to pose your questions to the super-knowledgeable people at RimFireCentral.
Sorry for vague answers - it's hard to fix something you can't see and don't quite know what's wrong! Good luck and please report back if you figure it out.
Thank you for an excellent write up. I bought a used Glenfield 60 recently and when I took it to the range it jammed several times. Thanks to your write up I was able to give it a thorough cleaning and improve the trigger. It is still very heavy, (I decided against the hammer strut spring modification for now) but it seems nice and clean and now I know exactly what is happening at each stage of pulling the trigger.
It's very exciting to be able to completely disassemble and reassemble my new rifle, thanks again.
Post a Comment